Navigation:
System Configuration Sensors > Configuring Sensors >> Electricity Meter Properties
Electricity Meter Properties

Contents
Voltage and Power Factor Meter properties can be altered for Current Clamp Sensors, along with Meter Tariffs.
Current Clamp Sensors are Synchronised using the EMS Remote Tools application.
•Synchronising Current Clamp Sensors
•Changing Electricity Meter Properties
Synchronising Current Clamp Sensors
The Synchronise process takes data from a connected USB device and updates its Serial Number and Calibration details in EMS at the same time as setting the Physical Transmit ID of the device.
•Synchronising Sensors facilitates efficient communication between the Sensor and EMS.
•Even if the Sensor is already running on EMS, it is strongly recommended to carry out Synchronisation to set a faster transmit rate for the Calibration run.
To Synchronise a Current Clamp Sensor:
1.Ensure that the Current Clamp Sensor Unit is connected to the PC/Server running the EMS application via the supplied Y055 USB lead.
2.Open the EMS Remote Management Tools.
•The EMS Management window is displayed once the Remote Management Tools have loaded.
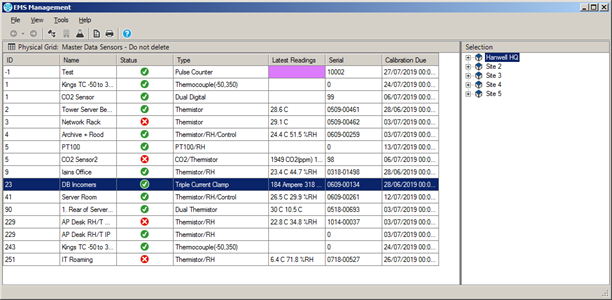
3.Select a Current Clamp Sensor from the EMS Remote Management Tools' EMS Management window. See Figure 930 below:
Figure 930
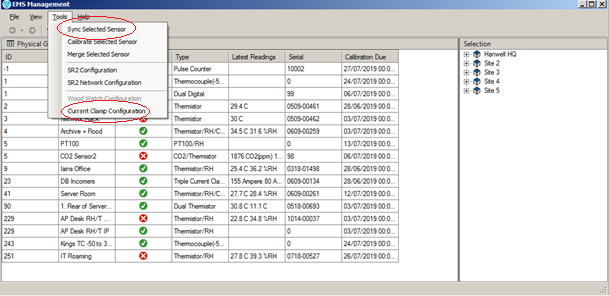
4.From the EMS Management window, select Sync Selected Sensor or Current Clamp Configuration from the Tools entry in the Main Menu bar. See Figure 931 below:
Figure 931
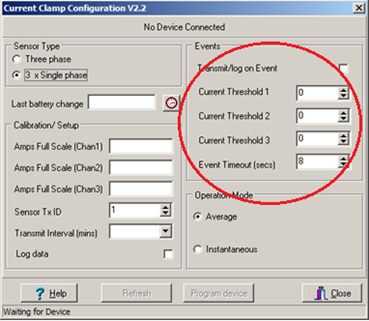
•The Current Clamp Configuration V2.2 window is displayed. See Figure 932 below:
Figure 932
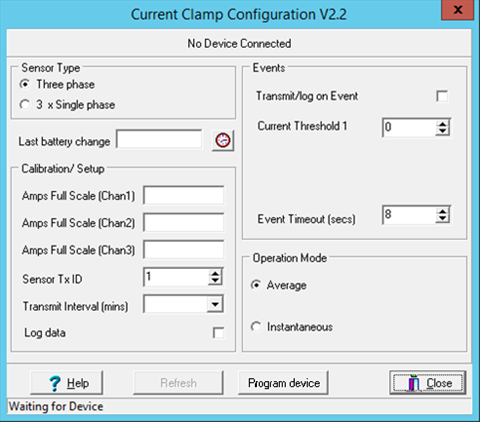
| Note: | The above window is from the Windows Server 2012 R2 operating System. The appearance of the window in Windows Server 2008 R2 or Windows 7 would be slightly different. |
The Configuration Parameters available through this window are outlined below:
•Log/Transmit Interval
➢10 seconds to 24 hours (HL4601)
➢1, 2, 3, 5, 15, 30 or 60 minutes (RL4601/4602)
•Operation Mode
➢Average or Instantaneous.
Average is recommended, particularly for the radio devices.
•Full Scale on the Current Clamps
➢Nominally 30.0, 60.00 or 120.0 Amps.
➢If a channel is unused then set this to 0.
•3 x Single Phase or Three Phase
The ONLY effect of this setting is related to the Event Logging.
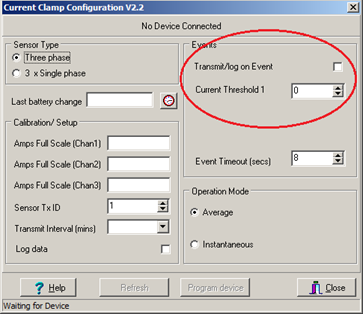
➢If Three Phase is selected, one current threshold will be applied to all clamps. See Figure 933 below:
Figure 933
➢If 3 x Single Phase is selected, then three individual thresholds can be entered. See Figure 934 below:
Figure 934
•Log on Event
React to high current levels
•Event Timeout
Maximum time in seconds that Event is considered live.
➢Keep this value as small as reasonable to maximise battery life and minimize radio traffic (RL4106).
•Current Thresholds
As required, set to 0 if not required on a particular channel.
•Battery Change Date
A record is kept in the device.
•Identification
HL4601 only - A string reflecting the intended usage, e.g. ‘Main Feed’.
•Transmitter ID
RL4601/4602 only - The ID used within Radiolog.
5.Enter or select the required values.
6.Click on Program device to Synchronise the Sensor.
Changing Electricity Meter Properties
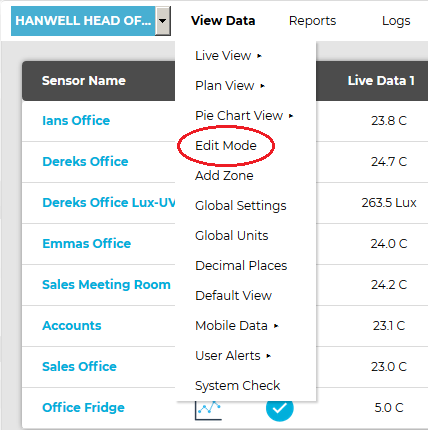
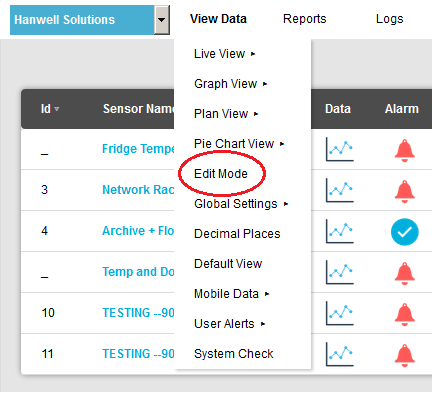
1.From the required Site's Live View window, select Edit Mode from the main View Data menu. See Figure 935 below: Figure 935
•The Editing and Configuration window is displayed. See Figure 936 below: Figure 936
•By default, the Sensor and Zone editing/configuration window for the Zone at the top of the left-hand menu is displayed. •To display another Zone's Editing and Configuration window, click on the entry for the required Zone in the left-hand menu. For an example, see Figure 937 below: Figure 937
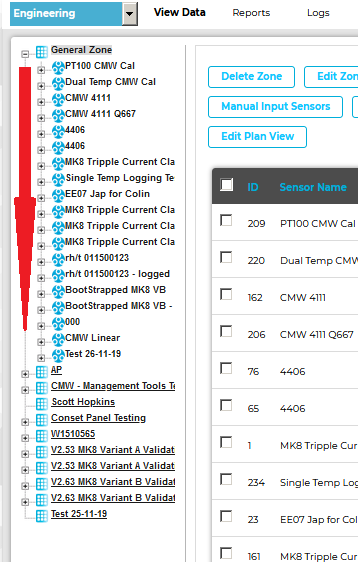
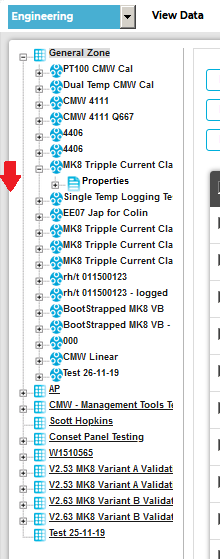
2.In the left-hand menu of the displayed Editing and Configuration window, click on the + symbol next to the Zone containing the Current Clamp Sensors to be edited. •The selected branch will expand showing all of the available sensors for the selected Zone. See Figure 938 below: Figure 938
3.Click on the + symbol next to the Sensor name to view the properties of the Sensor that is to be Edited. •This will expand the branch again to show the Properties folder for the Sensor. See Figure 939 below: Figure 939
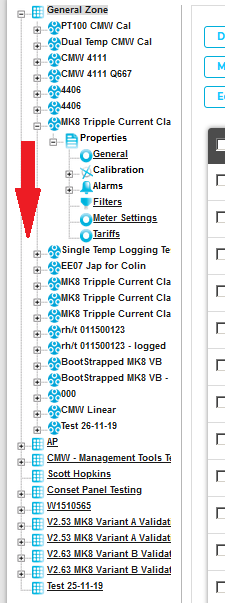
4.Click on the + symbol next to Properties to access the individual Sensor properties. •This will expand the branch again to show the Sensor's configurable Properties. See Figure 940 below: Figure 940
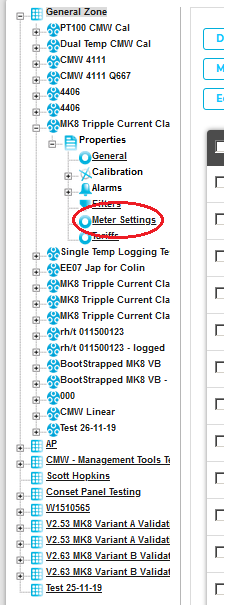
5.Click on the Meter Settings icon. See Figure 941 below: Figure 941
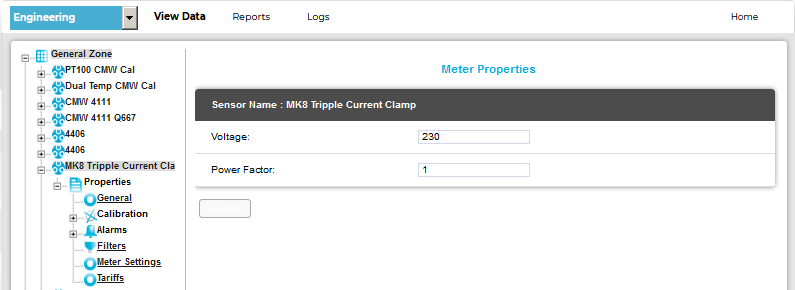
•The Meter Properties window is displayed. See Figure 942 below: Figure 942
6.Edit the Voltage and Power Factor values in their respective fields in the Meter Settings window. 7.Click on the Update button to accept the changes. •This will save the edited Meter Properties' values for the currently selected Current Clamp Sensor. |

1.From the required Site's Live View window, select Edit Mode from the main View Data menu. See Figure 943 below:
Figure 943
•The Site's Edit Mode window is displayed. See Figure 944 below:
Figure 944
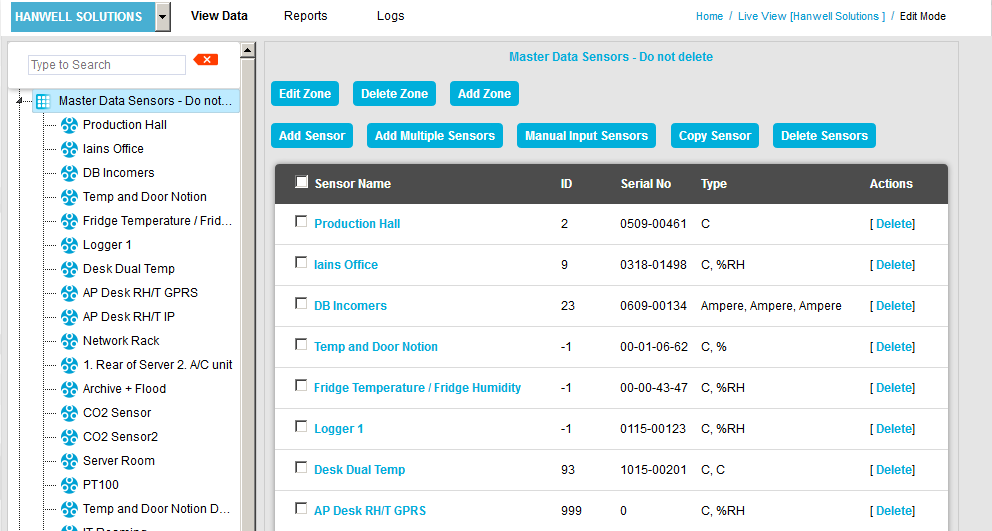
•By default, the Sensor and Zone editing/configuration window for the Zone at the top of the left-hand menu is displayed.
•To display another Zone's Edit Mode window, click on the entry for the required Zone in the left-hand menu. For an example, see Figure 945 below:
Figure 945

2.Either:
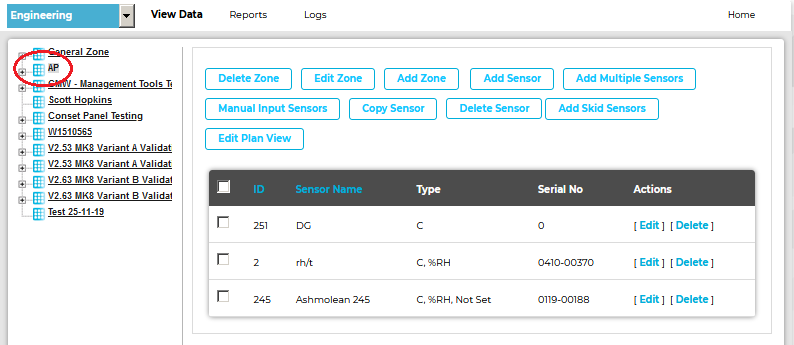
i.In the left-hand list of the Zone's Edit Mode window, click on the small 'arrow' symbol to display a list of the Sensors associated with the Zone. See Figure 946 below:
Figure 946
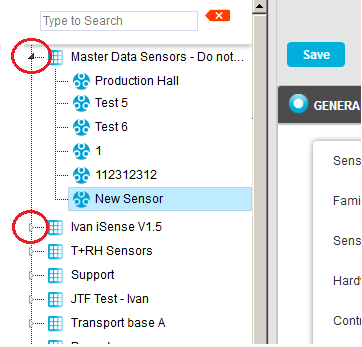
ii.In the left-hand list, click on the required Current Clamp Sensor's icon ![]() .
.
Or:
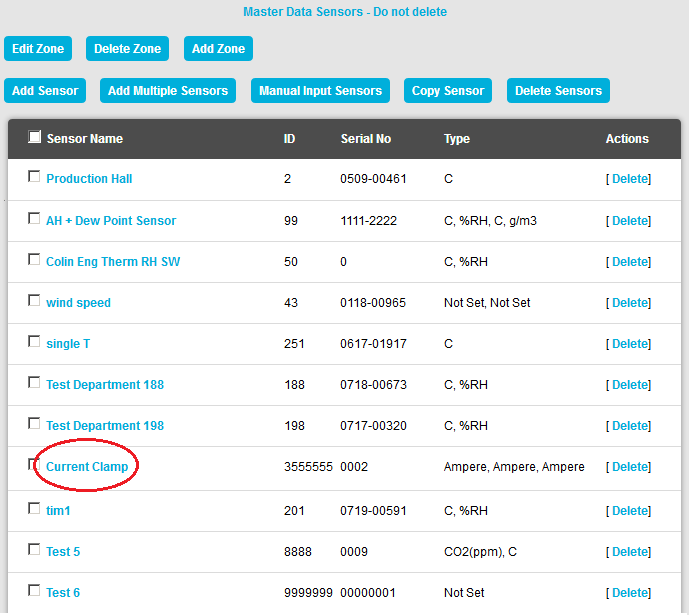
In table in the Zone's Edit Mode window, click on the required Current Clamp Sensor's name in the Sensor Name column. See Figure 947 below:
Figure 947
•The Edit Mode window for the selected Current Clamp Sensor is displayed. See Figure 948 below:
Figure 948
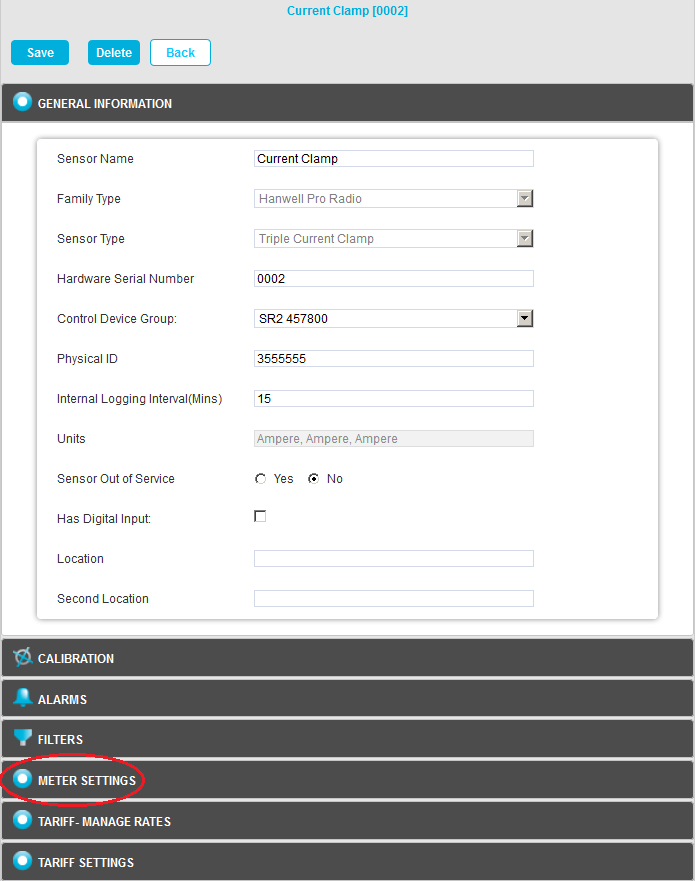
3.Click on the METER SETTINGS tab. See Figure 948 above.
•The Meter Settings window is displayed. See Figure 949 below:
Figure 949
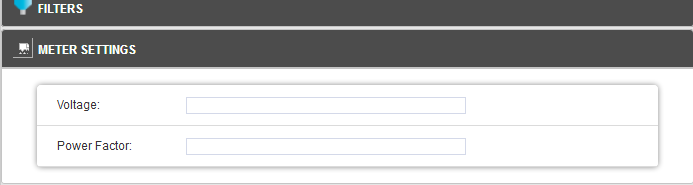
4.Edit the Voltage and Power Factor values in their respective fields in the Meter Settings window.
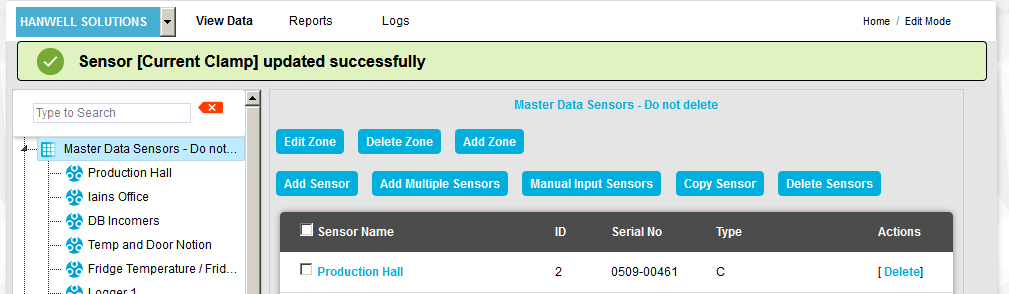
5.Click on the Save button at the top of the Current Clamp Sensor's Edit Mode window to accept the changes.
•This will save the Meter Properties' values for the currently selected Current Clamp Sensor.
•If the Update has been successful, you will be returned to the Zone's Edit Mode window and the following message will be displayed. See 950 below:
Figure 950
Meter Tariffs are used to define billing strategies.
•A Tariff consists of one or more bands (time periods within the day) together with an associated Unit cost.
➢For example, a Tariff might consist of a Peak Rate during the day with a lower cost off-peak charge in the early hours. All 24 hours must be covered.
•Each band has a Rate associated with it.
| Note: | Meter Tariff Rates must be defined before creating Meter Tariffs. |
1.From the required Site's Live View window, select Edit Mode from the main View Data menu. See Figure 951 below: Figure 951
•The Editing and Configuration window is displayed. See Figure 952 below: Figure 952
•By default, the Sensor and Zone editing/configuration window for the Zone at the top of the left-hand menu is displayed. •To display another Zone's Editing and Configuration window, click on the entry for the required Zone in the left-hand menu. For an example, see Figure 953 below: Figure 953
2.In the left-hand menu of the displayed Editing and Configuration window, click on the + symbol next to the Zone containing the Current Clamp Sensors to be edited. •The selected branch will expand showing all of the available sensors for the selected Zone. See Figure 954 below: Figure 954
3.Click on the + symbol next to the Sensor name to view the properties of the Sensor that is to be Edited. •This will expand the branch again to show the Properties folder for the Sensor. See Figure 955 below: Figure 955
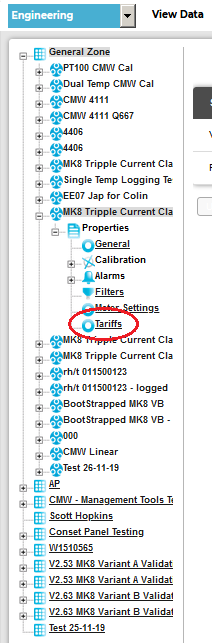
4.Click on the + symbol next to Properties to access the individual Sensor properties. •This will expand the branch again to show the Sensor's configurable Properties. See Figure 956 below: Figure 956
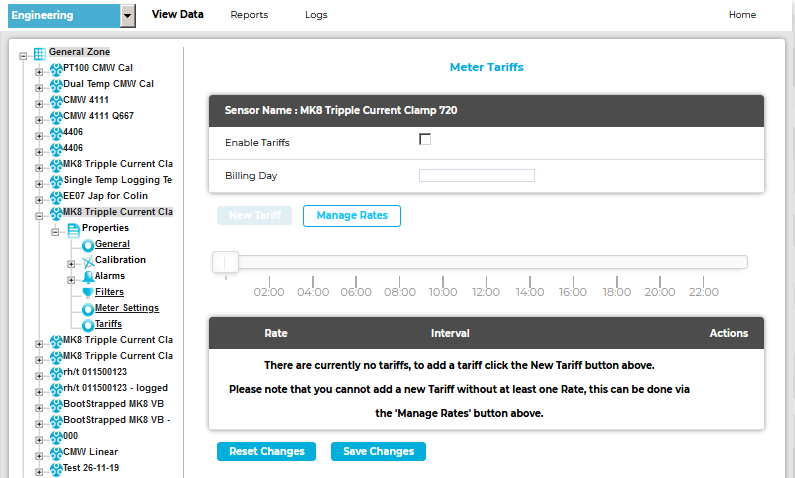
5.Click on the Tariffs icon. See Figure 957 below: Figure 957
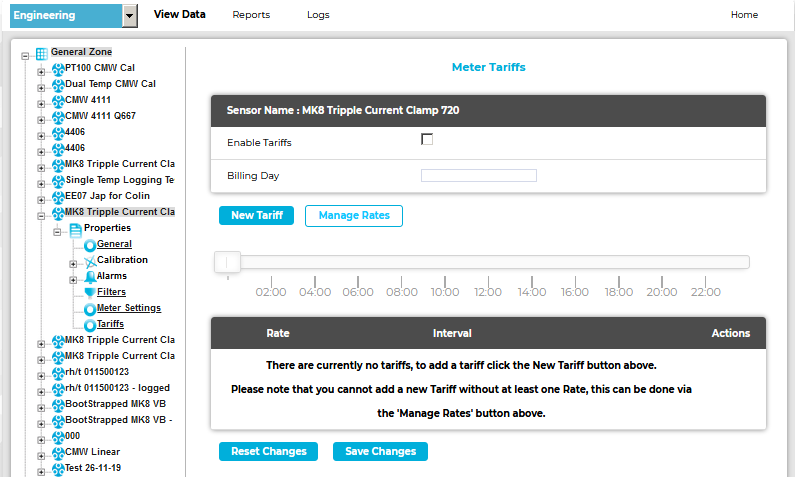
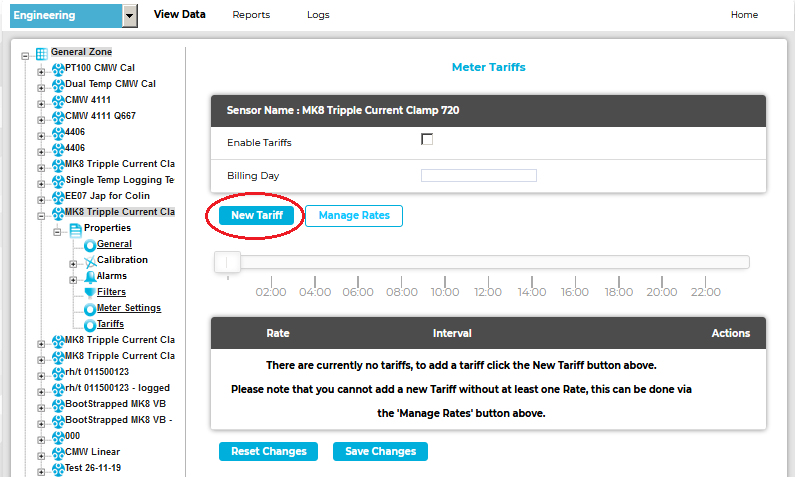
•If no Tariffs have been previously defined, the following Meter Tariffs window is displayed. See Figure 958 below: Figure 958
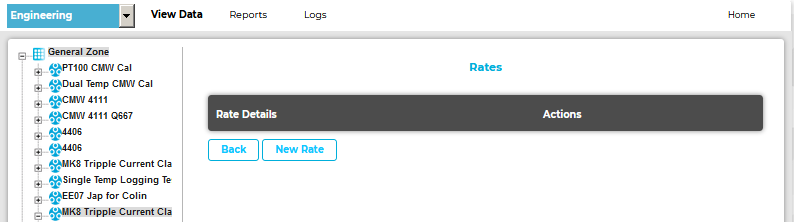
6.Set a Tariff Rate as follows: i.Click on the Manage Rates button. See Figure 958 above. •The Rates window is displayed. See Figure 959 above: Figure 959
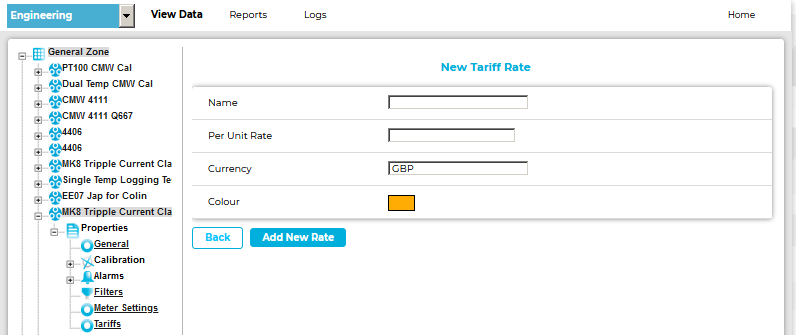
ii.Click on the New Rate button. iii.The New Tariff Rate window is displayed. See Figure 960 above: Figure 960
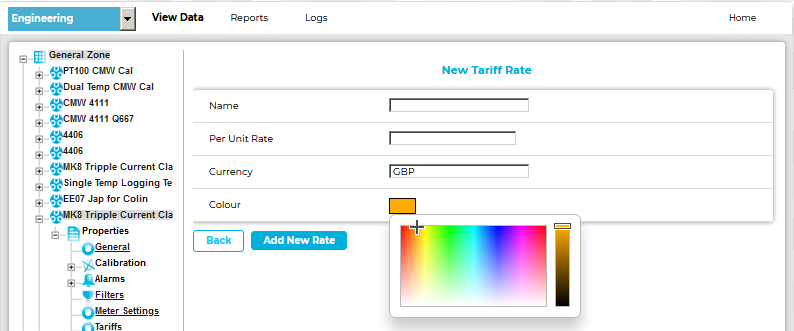
iv.Enter the following details: •An identifying Name for the Rate. •The Tariff’s Per Unit Rate. •The Currency the Rate is to be charged in. •A Colourcolorfrom the palette to identify/highlight the particular Tariff Rate. See Figure 961 below: Figure 961
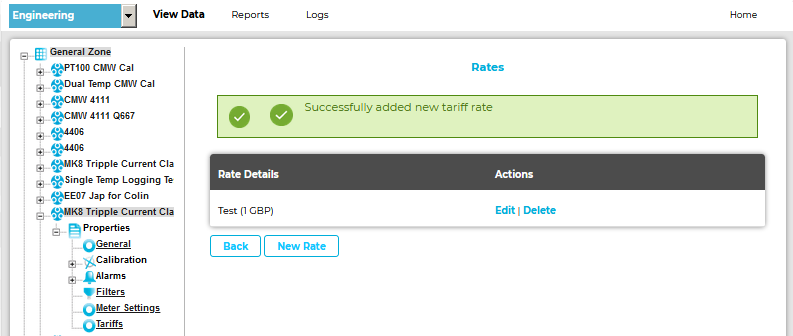
a)Click on the colourcolorblock to display the Palette. b)Click on the required colourcoloron the Palette to select it. v.Click on the Add New Rate button. •You are returned to the Rates window, which now displays the new Tariff Rate and a green message dialog confirming that the new Tariff Rate has been added successfully. See Figure 962 below: Figure 962
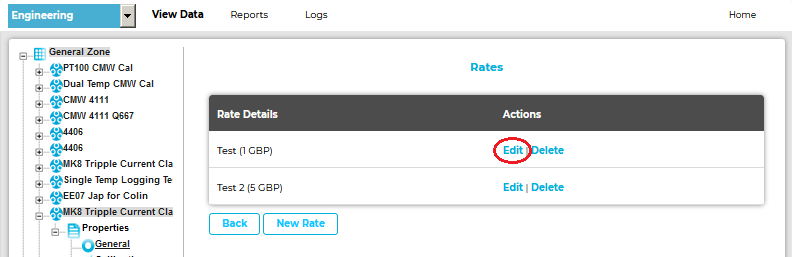
•Repeat Steps ii to v to add further Tariff Rates. vi.When all required Rates have been added, click on the Back button on the Rates window. •The Meter Tariffs window is displayed again, with the New Tariff button enabled. See Figure 963 below: Figure 963
Editing a Tariff Rate 1.In the Meter Tariffs window, click on the Manage Rates button. See Figure 963 above. •The Rates window is displayed.
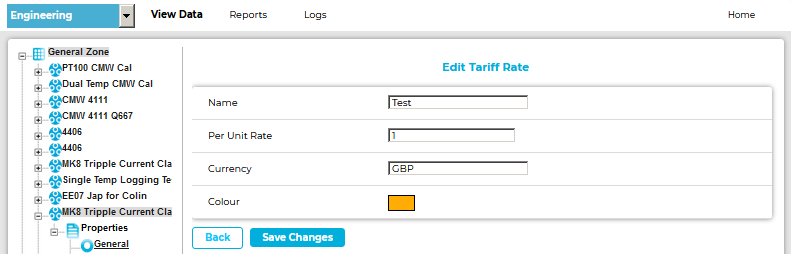
2.Click on Edit adjacent to the Tariff Rate you wish to edit. See Figure 963 above. •The Edit Tariff Rate window is displayed. See Figure 964 below: Figure 964
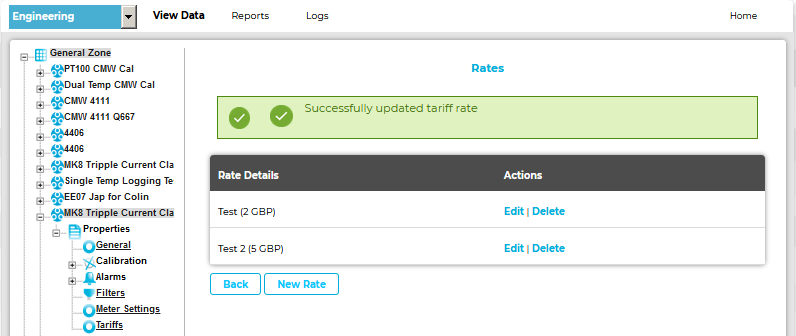
3.Edit the fields in the window as required (see Step iv) above. 4.When all changes have been made, click on Save Changes. •You are returned to the Rates window which now displays the edited Tariff Rate details and a green message confirming the change(s). See Figure 965 below: Figure 965
Deleting a Tariff Rate 1.In the Meter Tariffs window, click on the Manage Rates button. See Figure 965 above. •The Rates window is displayed. See Figure 966 below: Figure 966
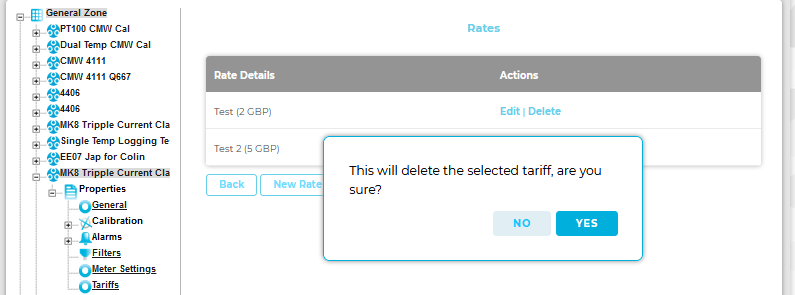
3.Click on Delete adjacent to the Tariff Rate you wish to delete. See Figure 966 above. •A warning dialog box is displayed. See Figure 967 below: Figure 967
4.Click on Yes to delete the selected Tariff or No to cancel the deletion. |

1.From the required Site's Live View window, select Edit Mode from the main View Data menu. See Figure 968 below: Figure 968
•The Edit Mode window is displayed. See Figure 969 below: Figure 969
•By default, the Sensor and Zone editing/configuration window for the Zone at the top of the left-hand menu is displayed. •To display another Zone's Edit Mode window, click on the entry for the required Zone in the left-hand menu. For an example, see Figure 970 below: Figure 970
2.Either: i.In the left-hand list of the Zone's Edit Mode window, click on the small 'arrow' symbol to display a list of the Sensors associated with the Zone. See Figure 971 below: Figure 971
ii.In the left-hand list, click on the required Current Clamp Sensor's icon Or: In the table in the Zone's Edit Mode window, click on the required Current Clamp Sensor's name in the Sensor Name column. See Figure 972 below: Figure 972
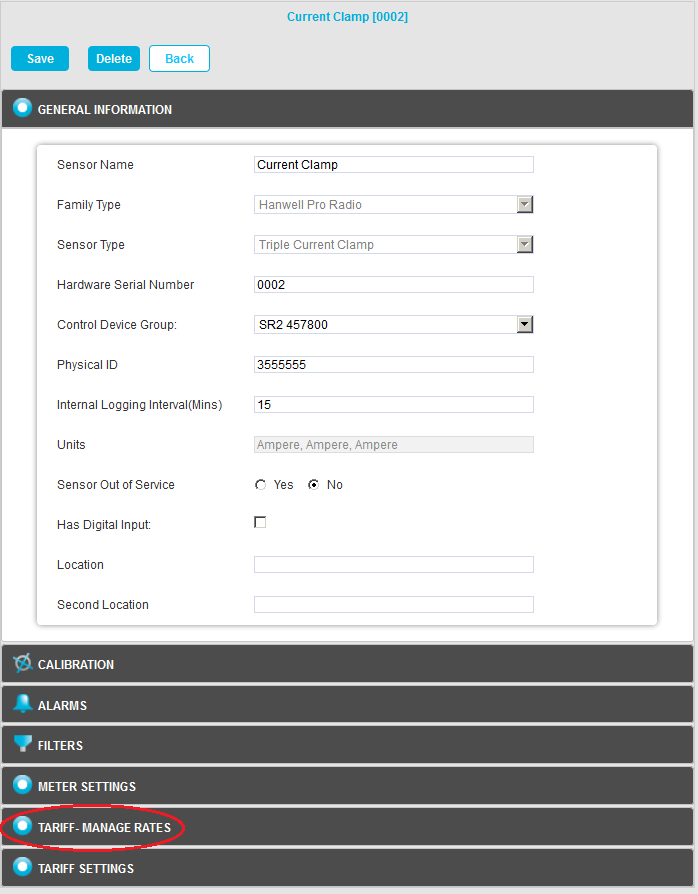
•The Edit Mode window for the selected Current Clamp Sensor is displayed. See Figure 973 below: Figure 973
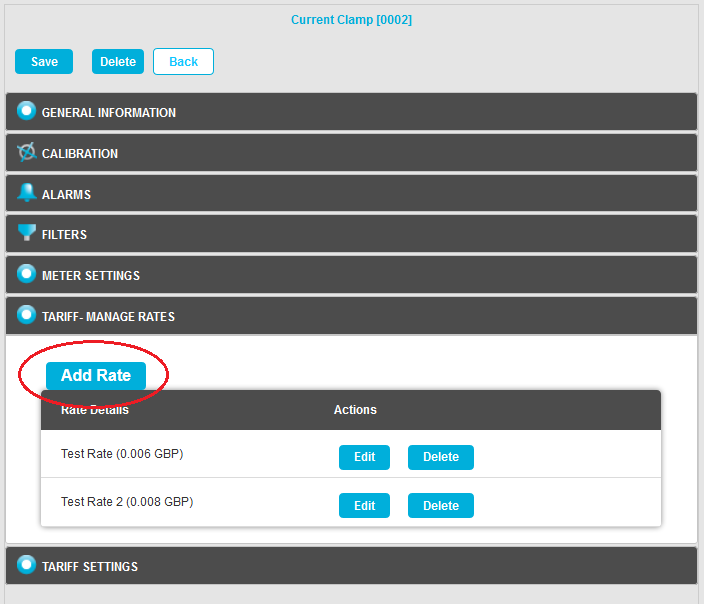
3.Click on the TARIFF-MANAGE RATES field. See Figure 973 above. •The TARIFF-MANAGE RATES pane is displayed. See Figure 974 below: Figure 974
•The Tariff rates are displayed (in brackets) in the Rate Details column. 4.Click on the Add Rate button. See Figure 974 above. •The Manage Rate window is displayed. See Figure 975 below: Figure 975
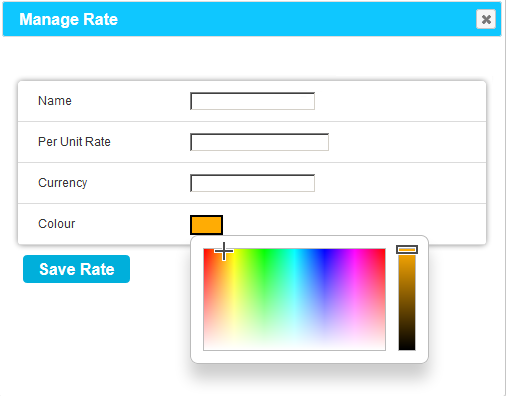
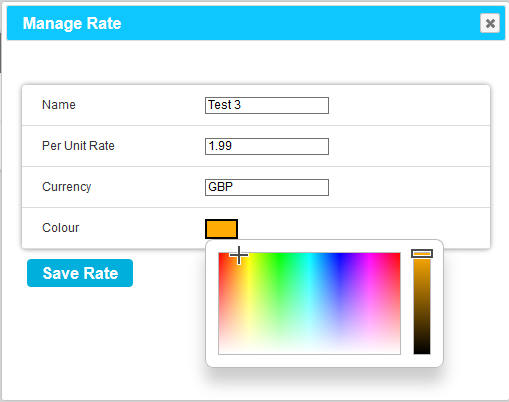
5.Enter the following details: •An identifying Name for the Rate. •The Tariff’s Per Unit Rate. •The Currency the Rate is to be charged in. •A Colourcolorfrom the palette to identify/highlight the particular Tariff Rate. See Figure 976 below: Figure 976
i.Click on the colourcolorblock to display the Palette. ii.Click on the required colourcoloron the Palette to select it. 6.Click on Save Rate. •You are returned to the TARIFF-MANAGE RATES window which now displays the new Tariff Rate. •Repeat Steps 4 to 6 to add further Tariff Rates. |
For EMS Version 1.0.12 onwards, Tariff Rates are applied to all relevant Sensors, for the entire System as follows:
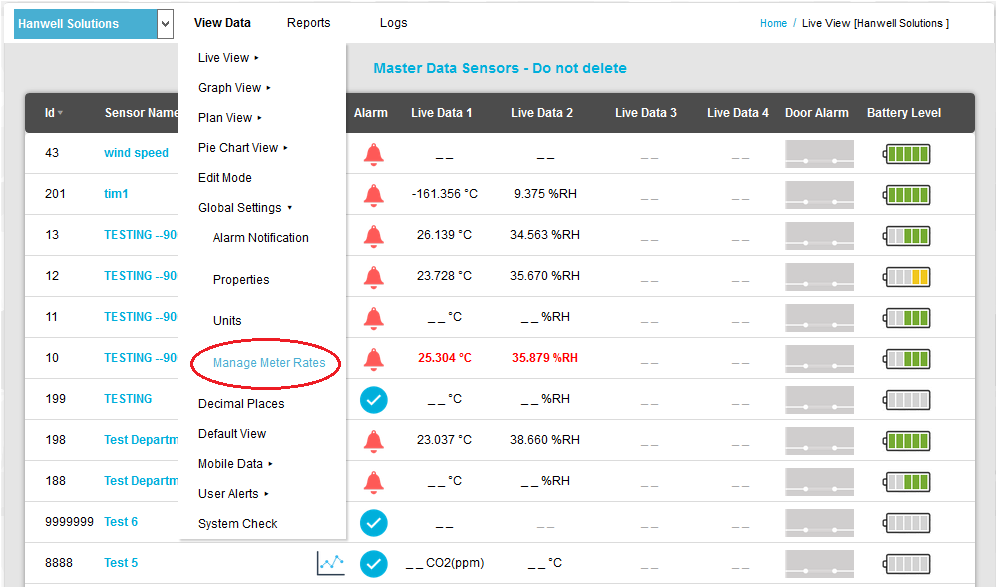
1.From the View Data main menu bar entry, select the Global Settings entry and then Manage Meter Rates from the displayed sub-menu. See Figure 977 below:
Figure 977
•The Manage Meter Rates window is displayed. See Figure 978 below:
Figure 978
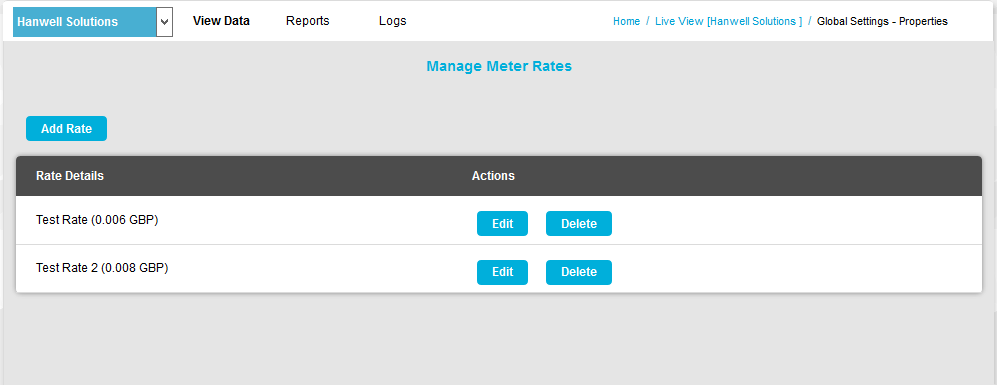
2.Click on the Add Rate button. See Figure 978 above.
•The Manage Rate window is displayed. See Figure 979 below:
Figure 979
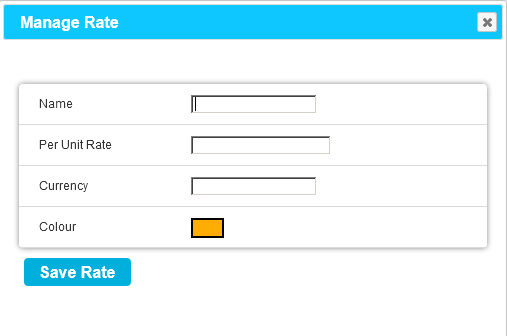
3.Enter the following details:
•An identifying Name for the Rate.
•The Tariff’s Per Unit Rate.
•The Currency the Rate is to be charged in.
•A Colourcolorfrom the palette to identify/highlight the particular Tariff Rate. See Figure 980 below:
Figure 980
i.Click on the colourcolorblock to display the Palette.
ii.Click on the required colourcoloron the Palette to select it.
4.Click on Save Rate.
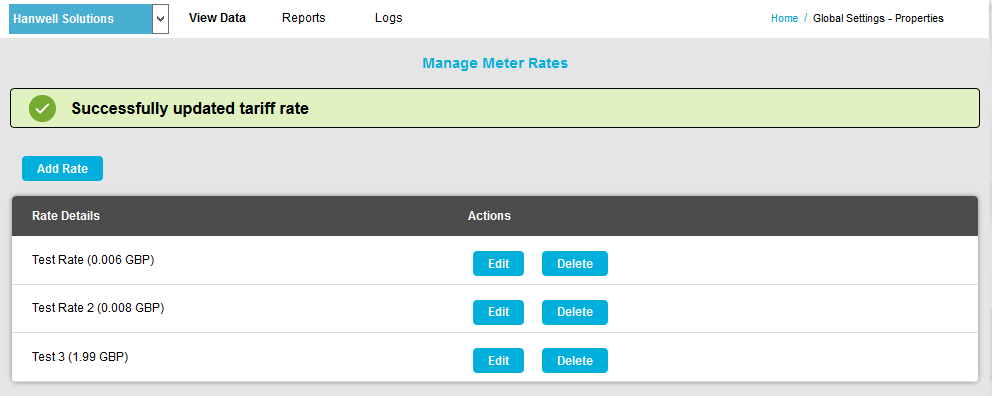
•You are returned to the Manage Meter Rates window.
•A green message box is displayed stating that the new Tariff Rate has been updated.
•The new Tariff Rate is added.
See Figure 981 below:
Figure 981
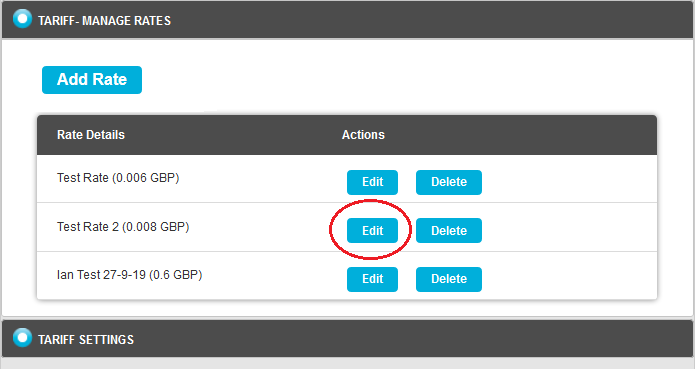
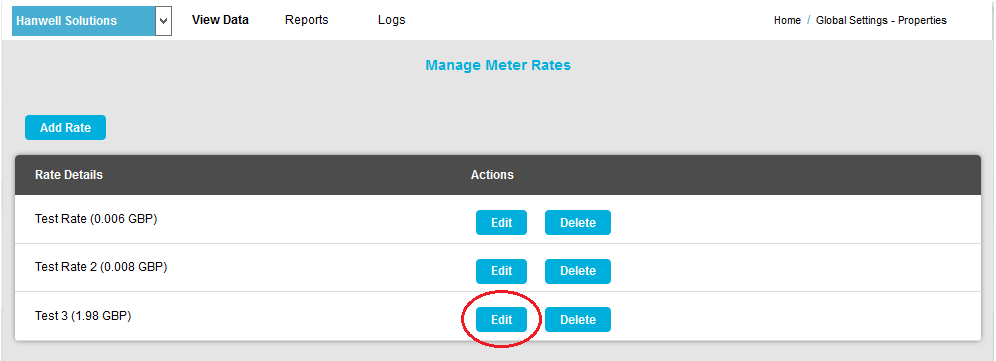
1.In the TARIFF-MANAGE RATES window, click on the Edit button adjacent to the Tariff Rate you wish to edit. See Figure 982 below: Figure 982
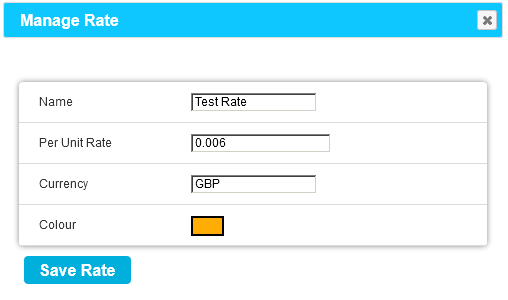
•The Manage Rate window for the selected Tariff Rate is displayed. See Figure 983 below: Figure 983
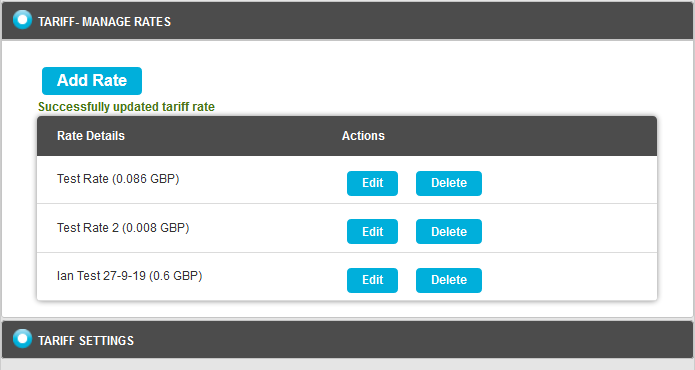
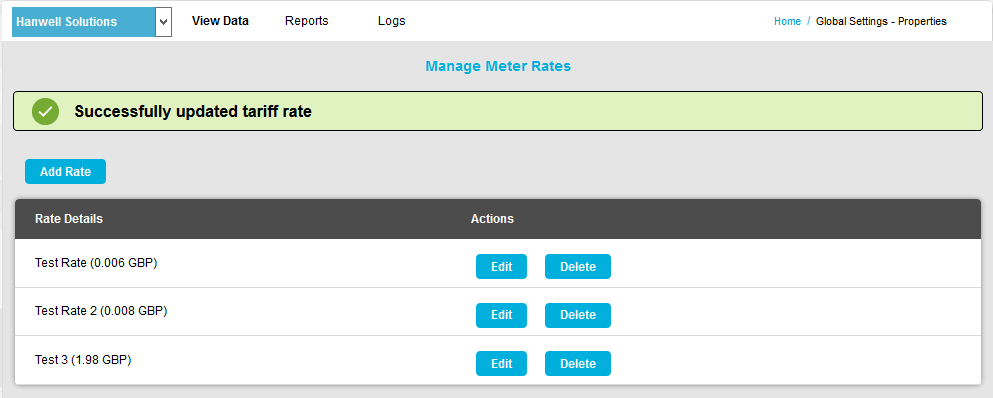
2.Edit the fields in the window as required. 3.When all changes have been made, click on Save Rate. •You are returned to the TARIFF-MANAGE RATES window which now displays the edited Tariff Rate details and a green message confirming the change(s). See Figure 984 below: Figure 984
|
1.In the Manage Meter Tariff Rates window, click on the Edit button adjacent to the Tariff Rate you wish to edit. See Figure 985 below:
Figure 985
•The Manage Rate window for the selected Tariff Rate is displayed. See Figure 986 below:
Figure 986
2.Edit the fields in the window as required. See Creating Meter Tariff Rates above.
3.When all changes have been made, click on Save Rate.
•You are returned to the TARIFF-MANAGE RATES window which now displays the edited Tariff Rate details and a green message confirming the change(s). See Figure 987 below:
Figure 987
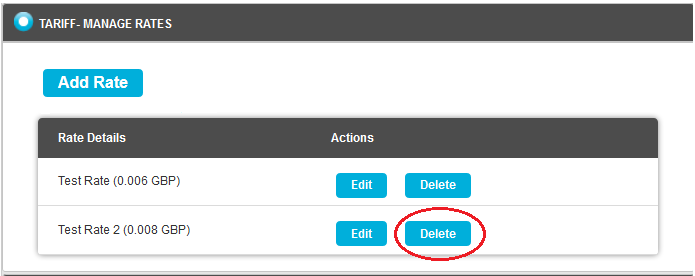
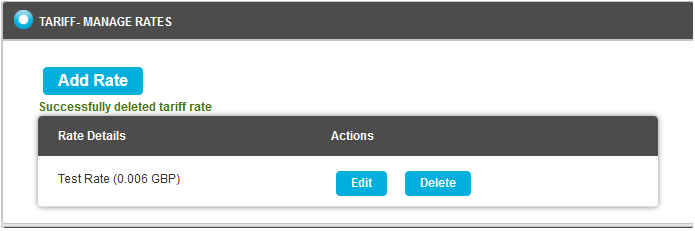
1.In the TARIFF_MANAGE RATES pane, click on the Delete button adjacent to the Tariff Rate you wish to delete. See Figure 987 below: Figure 988
•The selected Tariff Rate is deleted and a green message confirms the deletion. See Figure 989 below: Figure 989
|
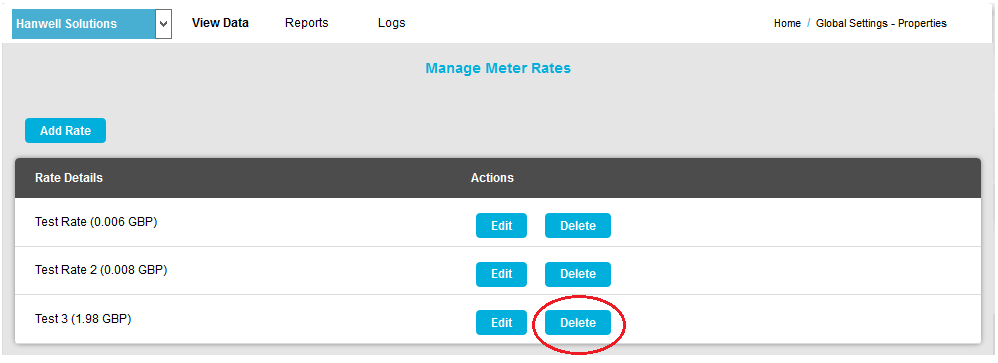
1.In the Manage Meter Tariff Rates window, click on the Delete button adjacent to the Tariff Rate you wish to delete. See Figure 990 below:
Figure 990
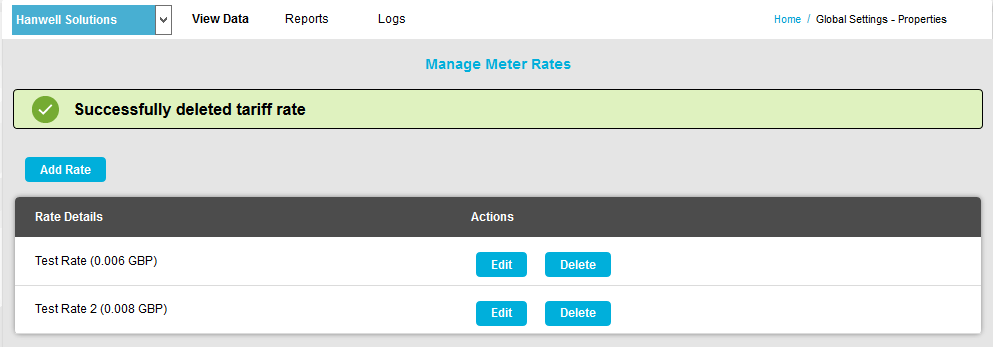
•The selected Tariff Rate is deleted and a green message dialog confirms the deletion. See Figure 991 below:
Figure 991
In the Meter Tariffs window, click on the New Tariff button. See Figure 992 below: Figure 992
•The Meter Tariffs window displays a Rate for the new Tariff, highlighting the Slider bar with the Rate’s defined colourcolor(see Colour Palette information above). ➢By default, the first Tariff Rate defined in the New Tariff Rates window is displayed. See Figure 993 below: Figure 993
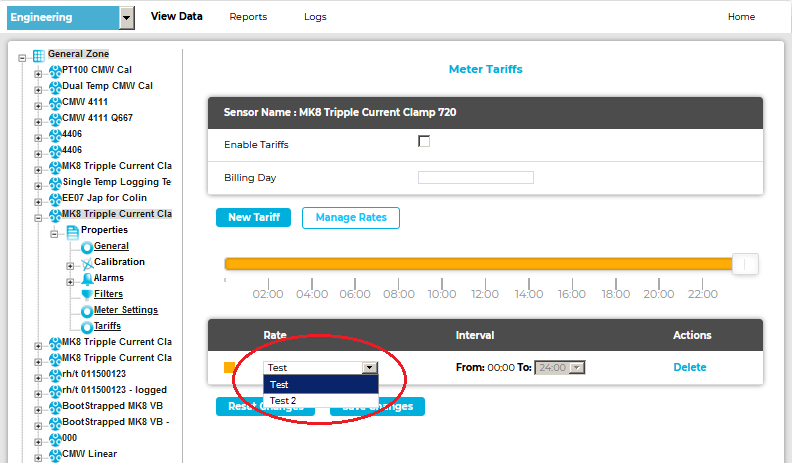
•To allocate another Tariff Rate to the Tariff, click on the Rate drop-down menu and select one of the displayed Tariff Rates. See Figure 994 below: Figure 994
|

1.From the selected Current Clamp Sensor's Edit Mode window, click on the TARIFF SETTINGS field. See Figure 995 below:
Figure 995

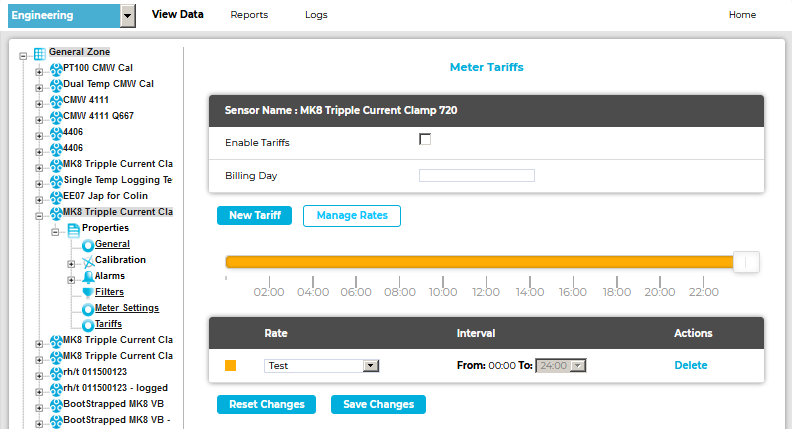
•The TARIFF SETTINGS pane is displayed. See Figure 996 below:
Figure 996
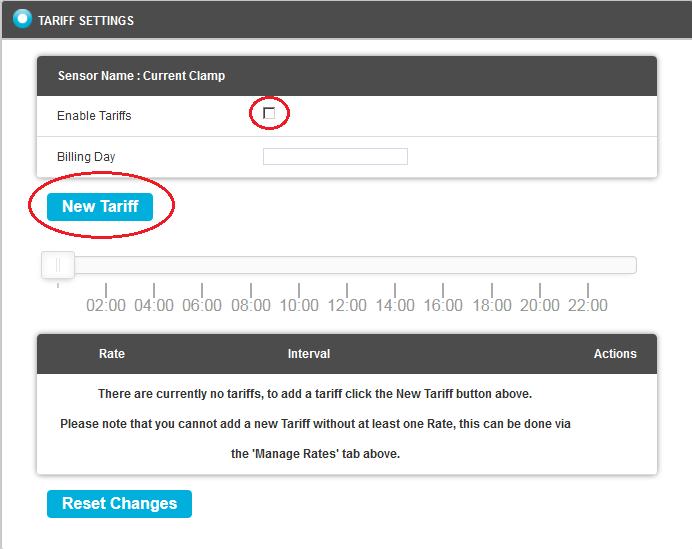
2.In the displayed pane:
i.Check the Enable Tariffs box.
ii.Enter a number (1 - 31) representing the day of the month that the Tariff will apply to into the Billing Day field.
iii.Click on the New Tariff button.
➢See Figure 996 above.
•The TARIFF SETTINGS pane displays a Test Rate for the Tariff, highlighting the Slider bar with the Rate’s defined colourcolor(see ColourcolorPalette information above). See Figure 997 below:
Figure 997
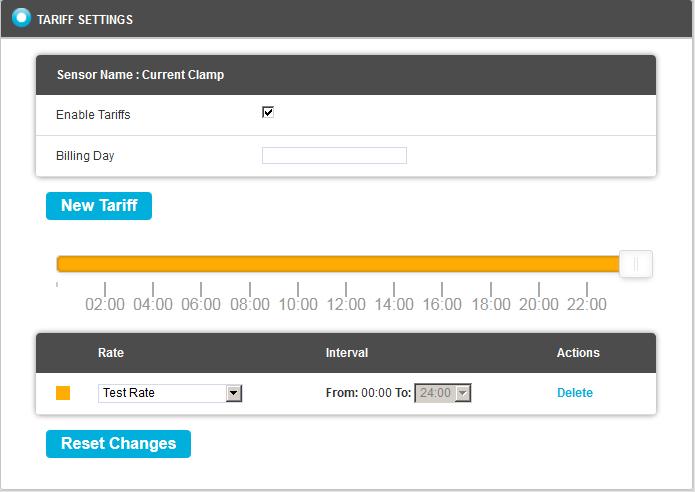
➢By default, the first Tariff Rate defined in the Manage Rates window is displayed.
| Note: | Initially, as only one Tariff Rate is associated with the Tariff, the Interval entry for the Tariff Rate will be inactive as the Tariff Rate will apply for the full 24 hour period. |
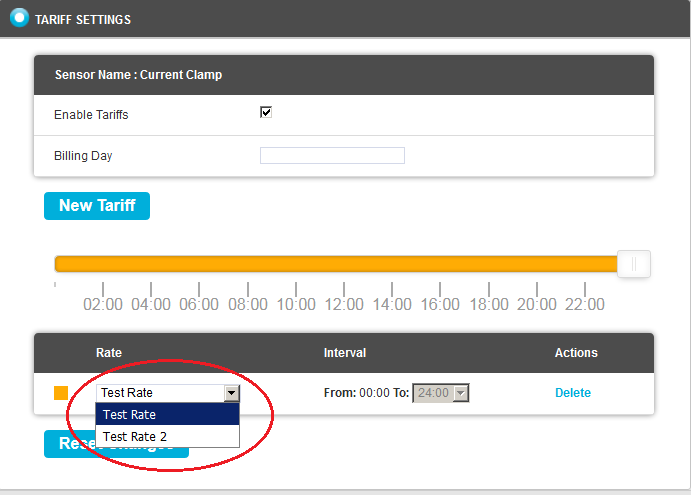
•To allocate another Tariff Rate to the Tariff, click on the Rate drop-down menu and select one of the displayed Tariff Rates. See Figure 998 below:
Figure 998
Defining Further Meter Tariffs
1.In the Meter Tariffs window, click on the New Tariff button. See Figure 999 below: Figure 999
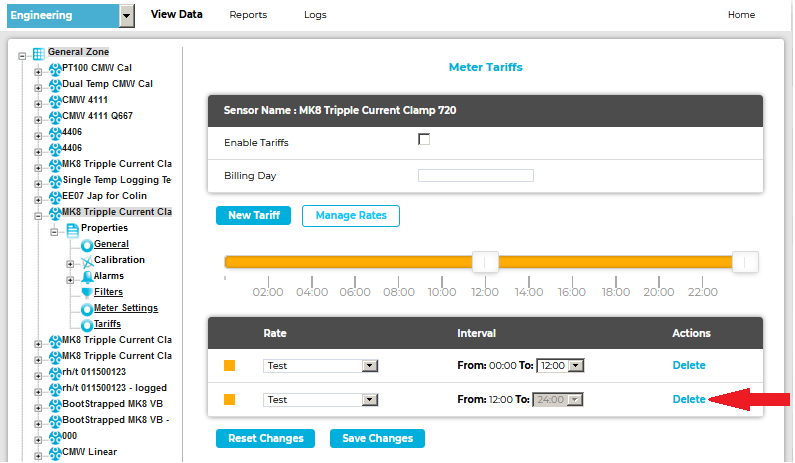
•The new Tariff is displayed in the Meter Tariffs window. See Figure 1000 below: Figure 1000
➢By default, the first Tariff Rate defined in the New Tariff Rate window is displayed for the new Tariff. oTo allocate another Tariff Rate to the Tariff, click on the new Tariff's Rate drop-down menu and select one of the displayed Tariff Rates. See Figure 999 above. •The Slider bar shows the defined colourscolorsfor each of the Tariff Rates allocated to the displayed Tariffs, indicating the time intervals over which they apply. See Figure 1001 below: Figure 1001
➢By default each Tariff is allocated a 12 hour period of activity. These periods can be varied by - Either: Moving the Slider left or right to adjust the time each Tariff is active for. Or: Selecting a time from the Interval drop-down list. See Figure 1001 above.
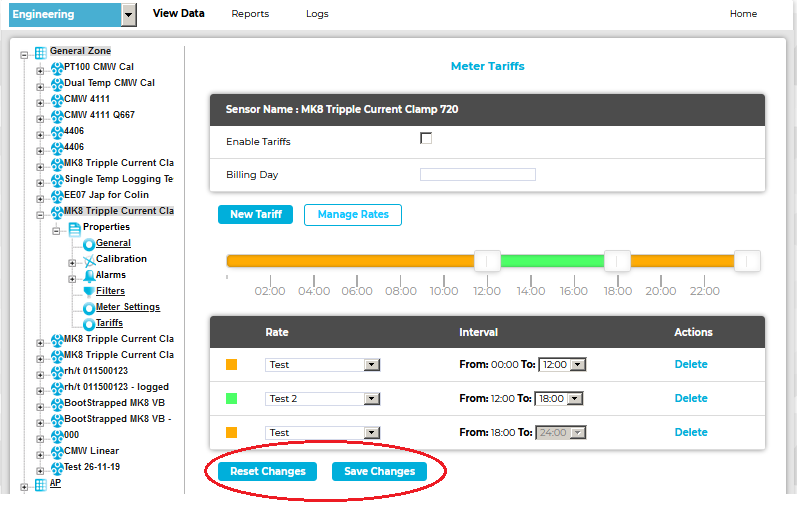
2.As with the first Tariff, select a Tariff Rate for it from its Rate drop-down list. See Figure 999 above. •Further Tariffs are added and their Tariff Rates selected in the same way. See Figure 1002 below: Figure 1002
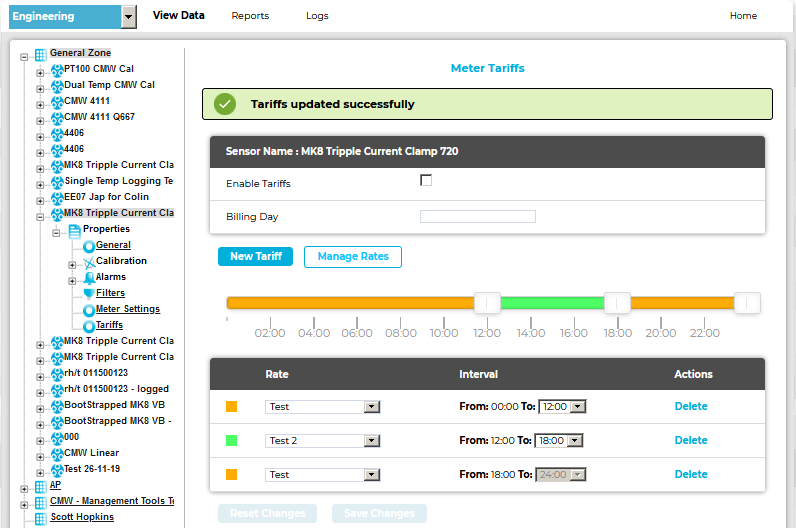
3.When all Tariffs and associated Tariff Rates have been defined: Either: Click on the Save Changes button at the bottom of the Meter Tariffs window. See Figure 1002 above. •The new Tariff(s) are associated with the selected Sensor and a green dialog box stating: 'Tariffs updated successfully' is displayed on the Meter Tariffs window. See Figure 1003 below: Figure 1003
Or: Click on the Reset Changes button to remove the changes applied to the Sensor's Tariffs. See Figure 1002 above. |
1.Click on the New Tariff button in the displayed TARIFF SETTINGS pane.
•The new Tariff is displayed in the TARIFF SETTINGS pane. See Figure 1004 below:
Figure 1004
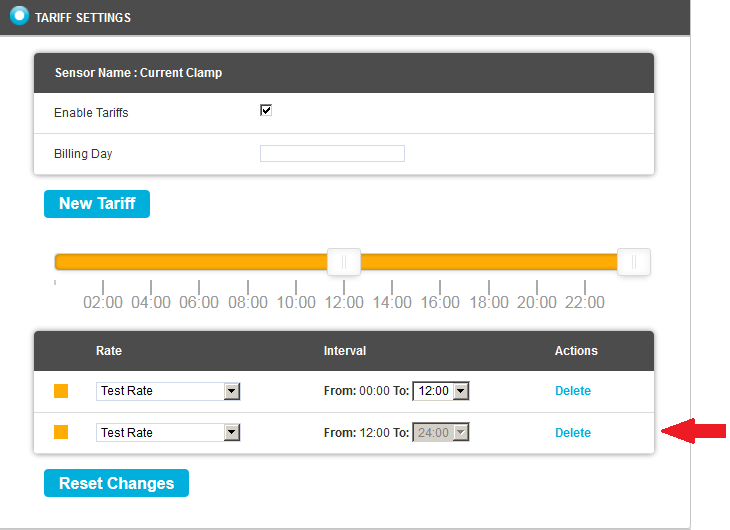
➢By default, the first Tariff Rate defined in the Manage Rates window is displayed for the new Tariff.
oTo allocate another Tariff Rate to the Tariff, click on the new Tariff's Rate drop-down menu and select one of the displayed Tariff Rates. See Figure 1003 above.
•The Slider bar shows the defined colourscolorsfor each of the Tariff Rates allocated to the displayed Tariffs, indicating the time intervals over which they apply. See Figure 1005 below:
Figure 1005
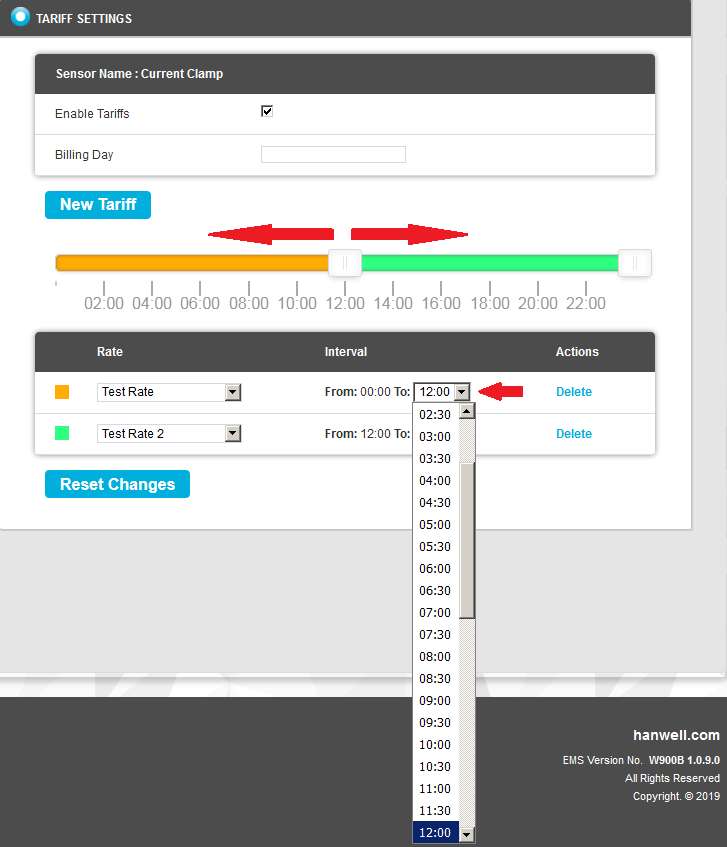
➢By default each Tariff is allocated a 12 hour period of activity. These periods can be varied by -
Either:
Moving the Slider left or right to adjust the time each Tariff is active for.
Or:
Selecting a time from the Interval drop-down list.
See Figure 1005 above.
| Note: | The Interval drop-down list will be inactive for a second added Tariff as the time it is active, in any 24 hour period, will be determined by the time period set for the first Tariff. |
2.As with the first Tariff, select a Tariff Rate for it from its Rate drop-down list. See Figure 1003 above.
•Further Tariffs are added and their Tariff Rates selected in the same way. See Figure 1006 below:
Figure 1006
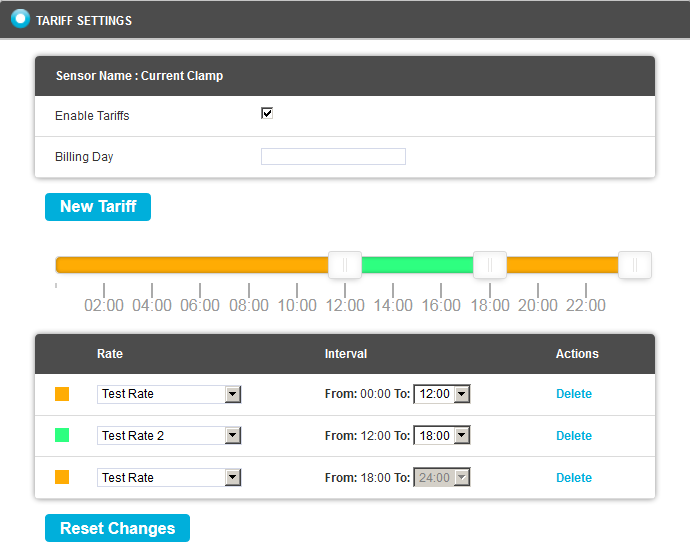
| Note: | The Interval drop-down list will be inactive for the final Tariff added as the time it is active, in any 24 hour period, is determined by the time periods set for the first and second Tariffs. |
3.When all Tariffs and associated Tariff Rates have been defined, click on the Save button at the top of the Edit Mode window. See Figure 1007 below:
Figure 1007
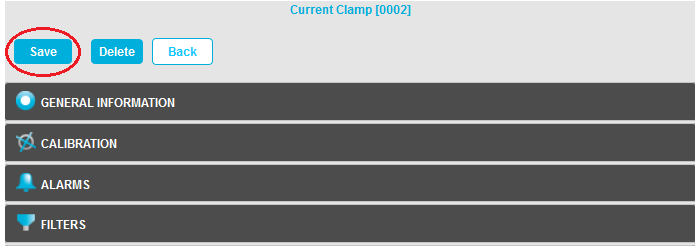
•You are returned to the Edit Mode main window and a green message dialog is displayed, if the selected Current Clamp Sensor's details have been updated successfully. See Figure 1008 below:
Figure 1008