
Contents
EMS allows Users to be associated with a Role or Roles and inherit the Role or Roles' associated Permissions, rather than having to individually allocate every required Permission to each individual User.
•Individual Permissions can still be assigned to individual Users if required.
When EMS is initially installed, there are no pre-defined Roles set, the User can create their own Roles and decide what Permissions to assign to each Role.
•Figure 376 below shows a typical set of Roles in the Role Name column.
•There is no limit to the amount of Roles that can be set.
Example Roles could include:
| This could be a high level Role, with all Permissions assigned. |
•Advanced User
This could be a trusted User, with access to Admin functions blocked but still able to edit Sensor properties. Full data viewing and alarm acknowledging allowed.
•General User
This could be a lower level User, with access to Admin functions and Sensor editing blocked. Full data viewing is allowed.
| This could be a view-only User with no editing or alarm acknowledging rights. Full data viewing is allowed. |
•Descriptions of what each Permission allows and the recommended User Level for each one are available in Permission Definitions.
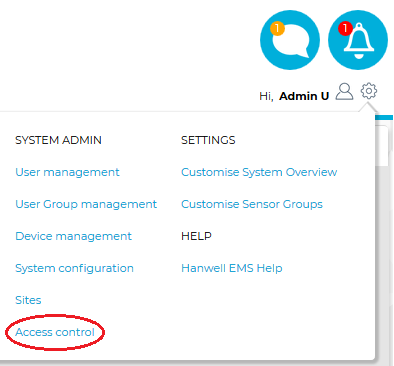
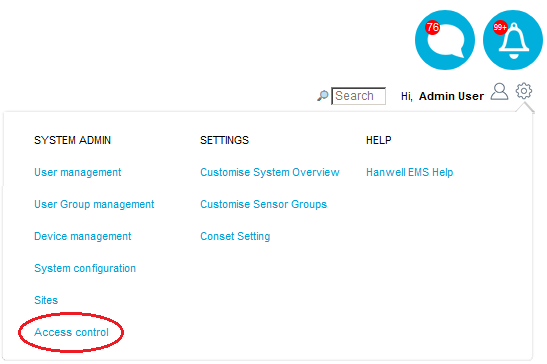
To add new Roles, either following installation of EMS or at any other time: 1.From the System menu, select Access control from the SYSTEM ADMIN list. See Figure 375 below:
Figure 375
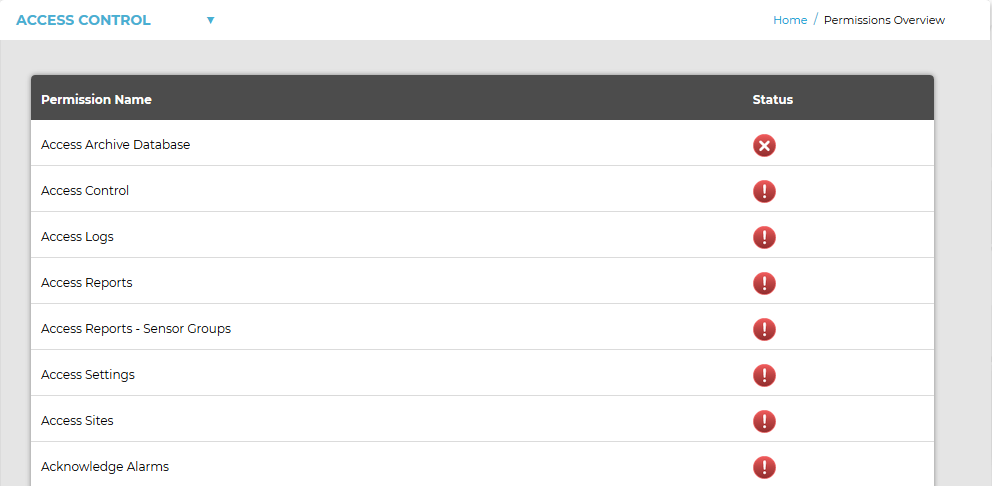
Figure 376 •The Permissions Overview window is displayed displaying a list of all available (Admin User) permissions. See Figure 377 below:
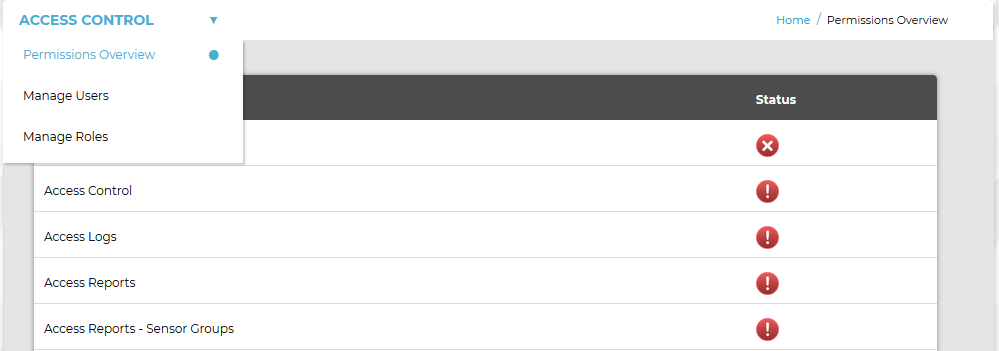
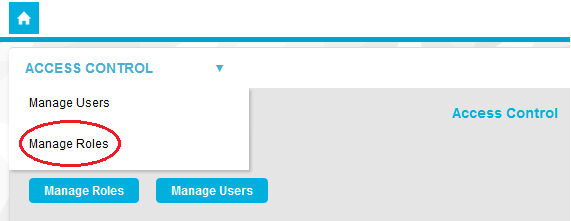
2.From the ACCESS CONTROL drop down menu, select Manage Roles. See Figure 377 below:
Figure 377
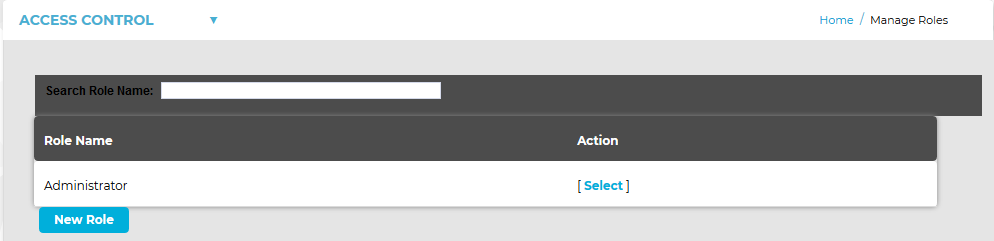
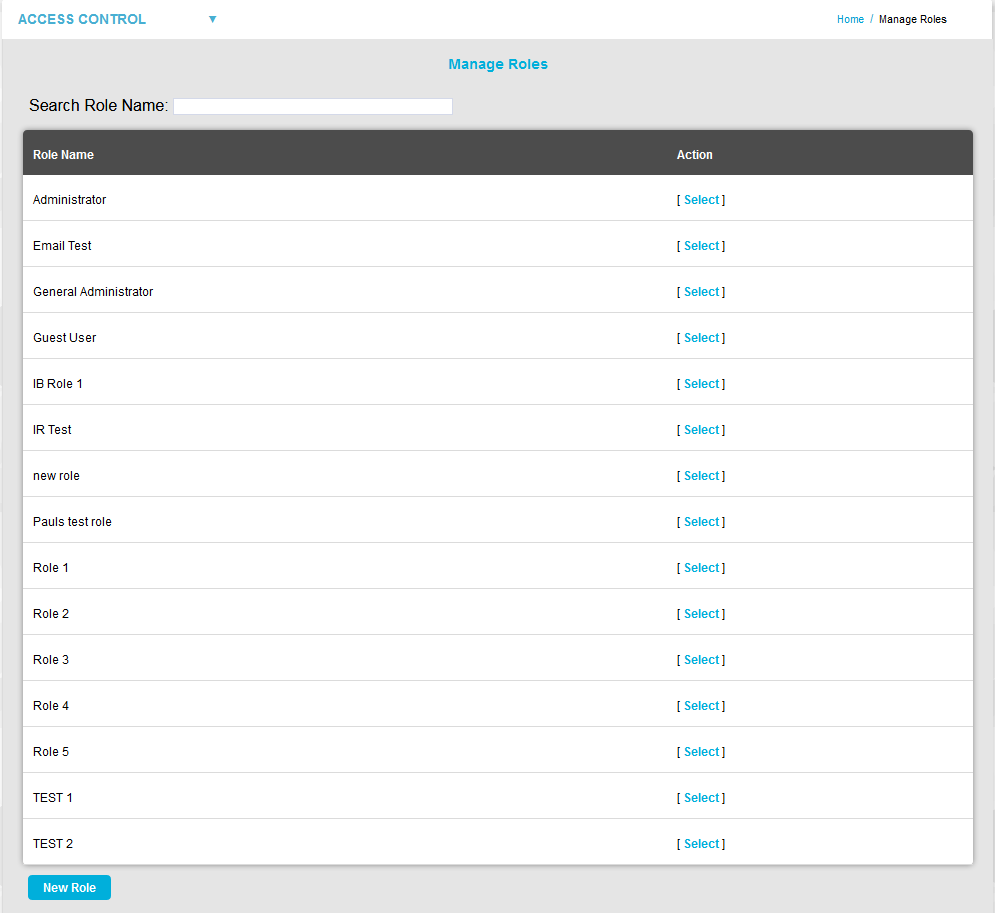
•The Manage Roles window is displayed. See Figure 378 below:
Figure 378
3.Click on the New Role button at the bottom of the Manage Roles window to display a further Manage Roles window. See Figure 379 below:
Figure 379
4.In the Role Name: field of the displayed window, enter a name for the new Role. •We would recommend using Administrator for the highest level User. •It is also suggested that all Permissions are set to Allow for the with the exception of Activate privileged Access which should be set to Deny. 5.Select Save. •You have now created your new Role. •Other Roles can be created as required by following the instructions above. •When the Select a Role to Manage window is displayed you can also allocate or remove Permissions to or from the Role or delete the Role entirely (see Managing Roles). |
To add new Roles, either following installation of EMS or at any other time:
1.From the System menu, select Access control from the SYSTEM ADMIN list. See Figure 380 below:
Figure 380
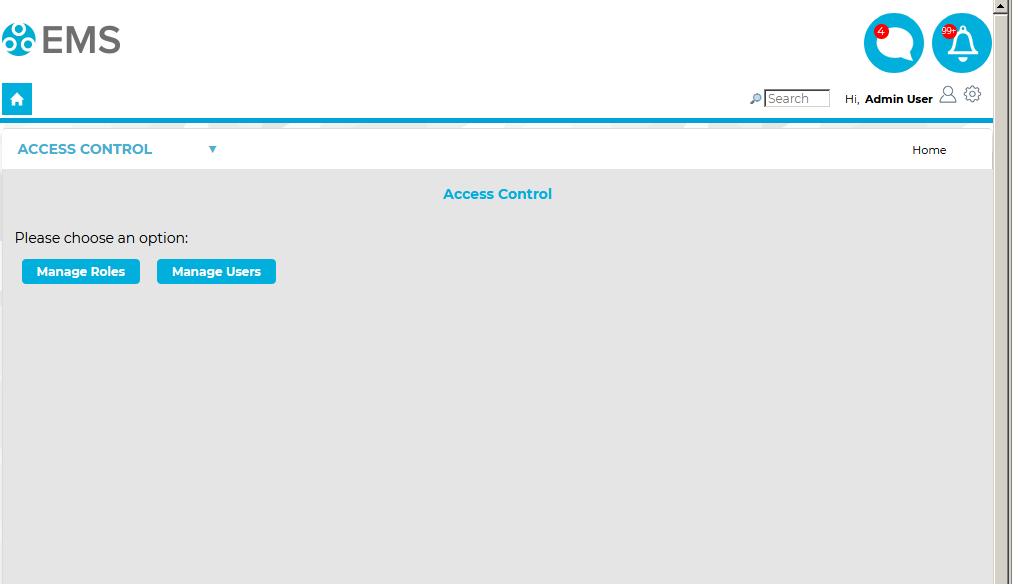
•The Access Control window with buttons for Manage Roles and Manage Users is displayed. See Figure 381 below:
Figure 381
2.Either:
Click on the Manage Roles button on the Access Control window. See Figure 381 above.
Or:
Select Manage Roles from the ACCESS CONTROL drop-down menu. See Figure 382 below:
Figure 382
•The Manage Roles window is displayed. See Figure 383 below:
Figure 383
3.Click on the New Role button at the bottom of the Manage Roles window to display a further Manage Roles window. See Figure 384 below:
Figure 384
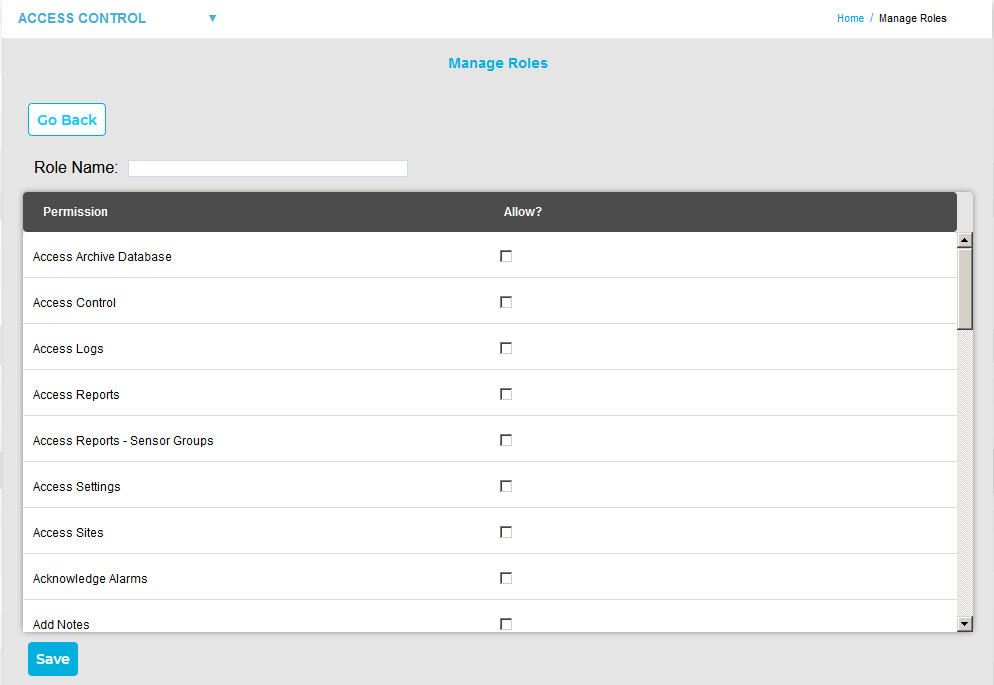
4.In the Role Name: field of the displayed window, enter a name for the new Role.
•We would recommend using Administrator for the highest level User.
5.Select Save.
•You are returned to the first Manage Roles window. and a green dialog box is displayed. See Figure 385 below:
Figure 385
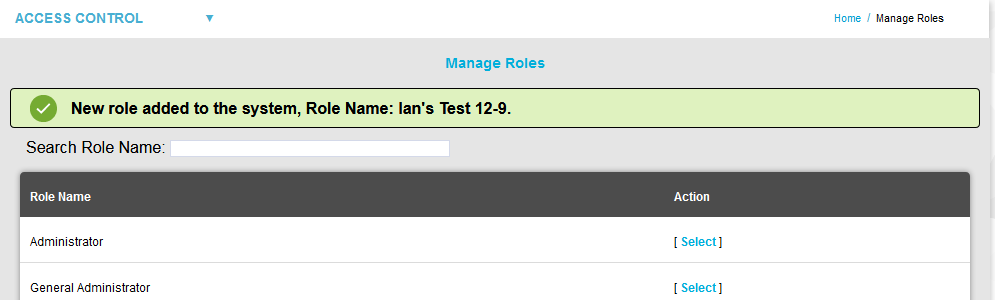
•You have now created your new Role.
•Other Roles can be created as required by following the instructions above.
Click here for details on Managing Roles if you are using a version of EMS prior to Version 1.0.9
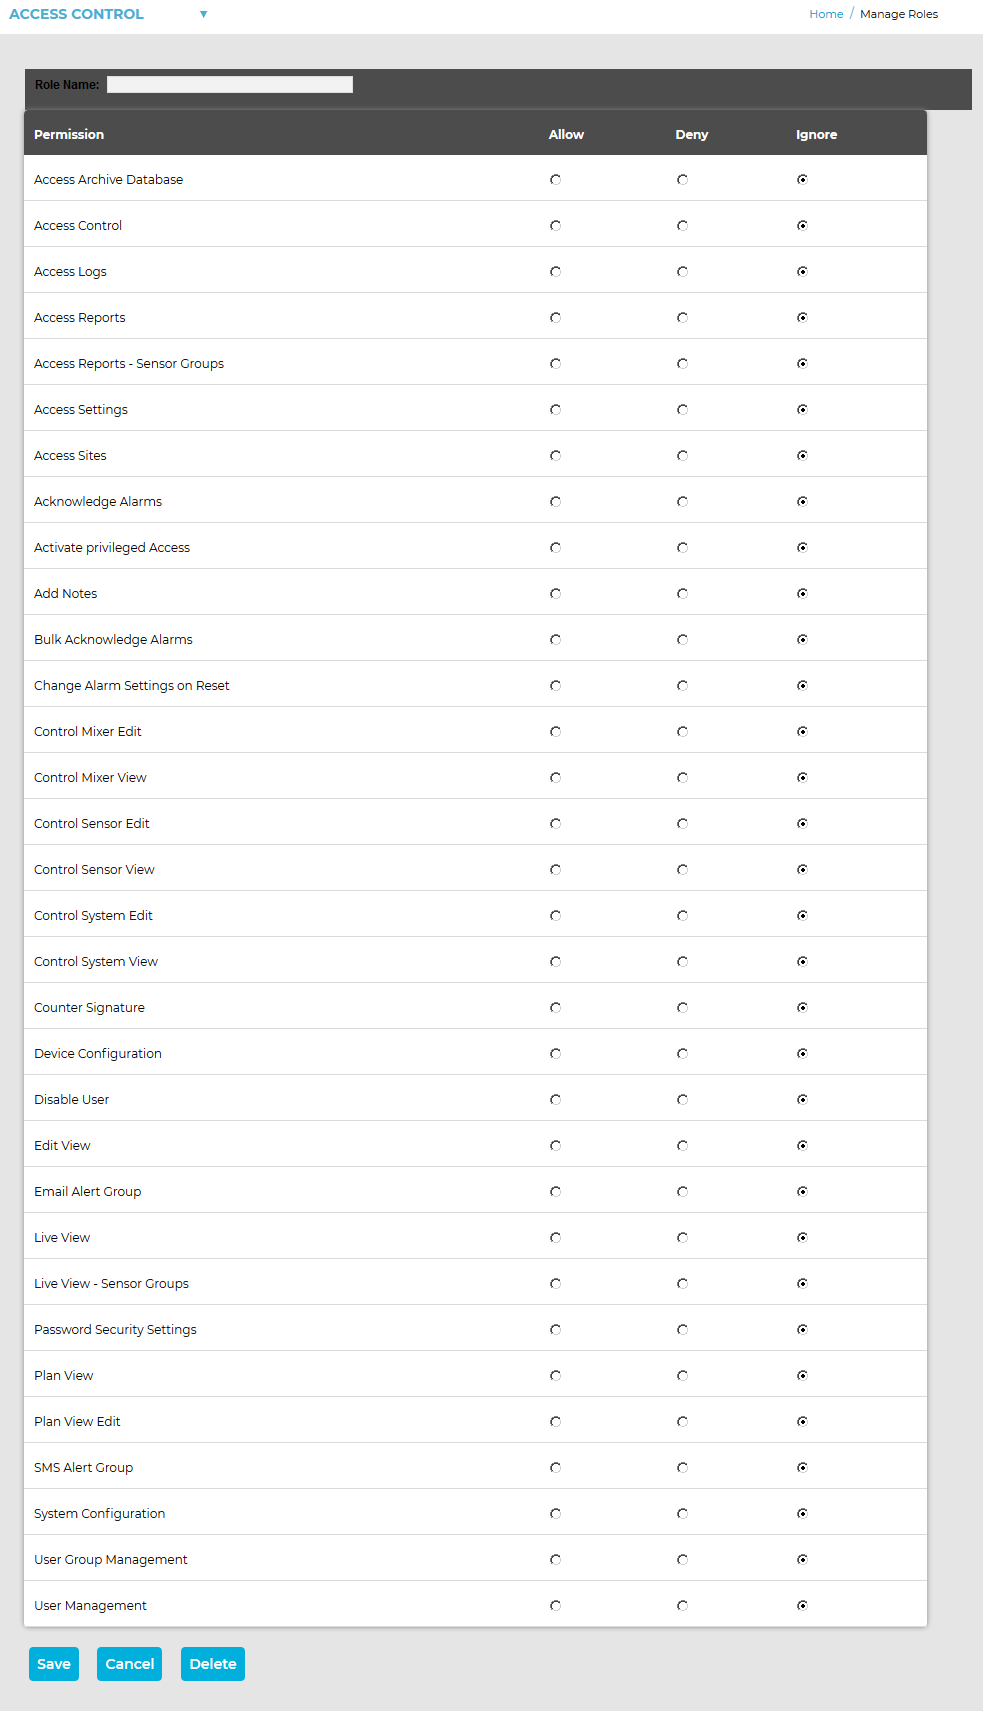
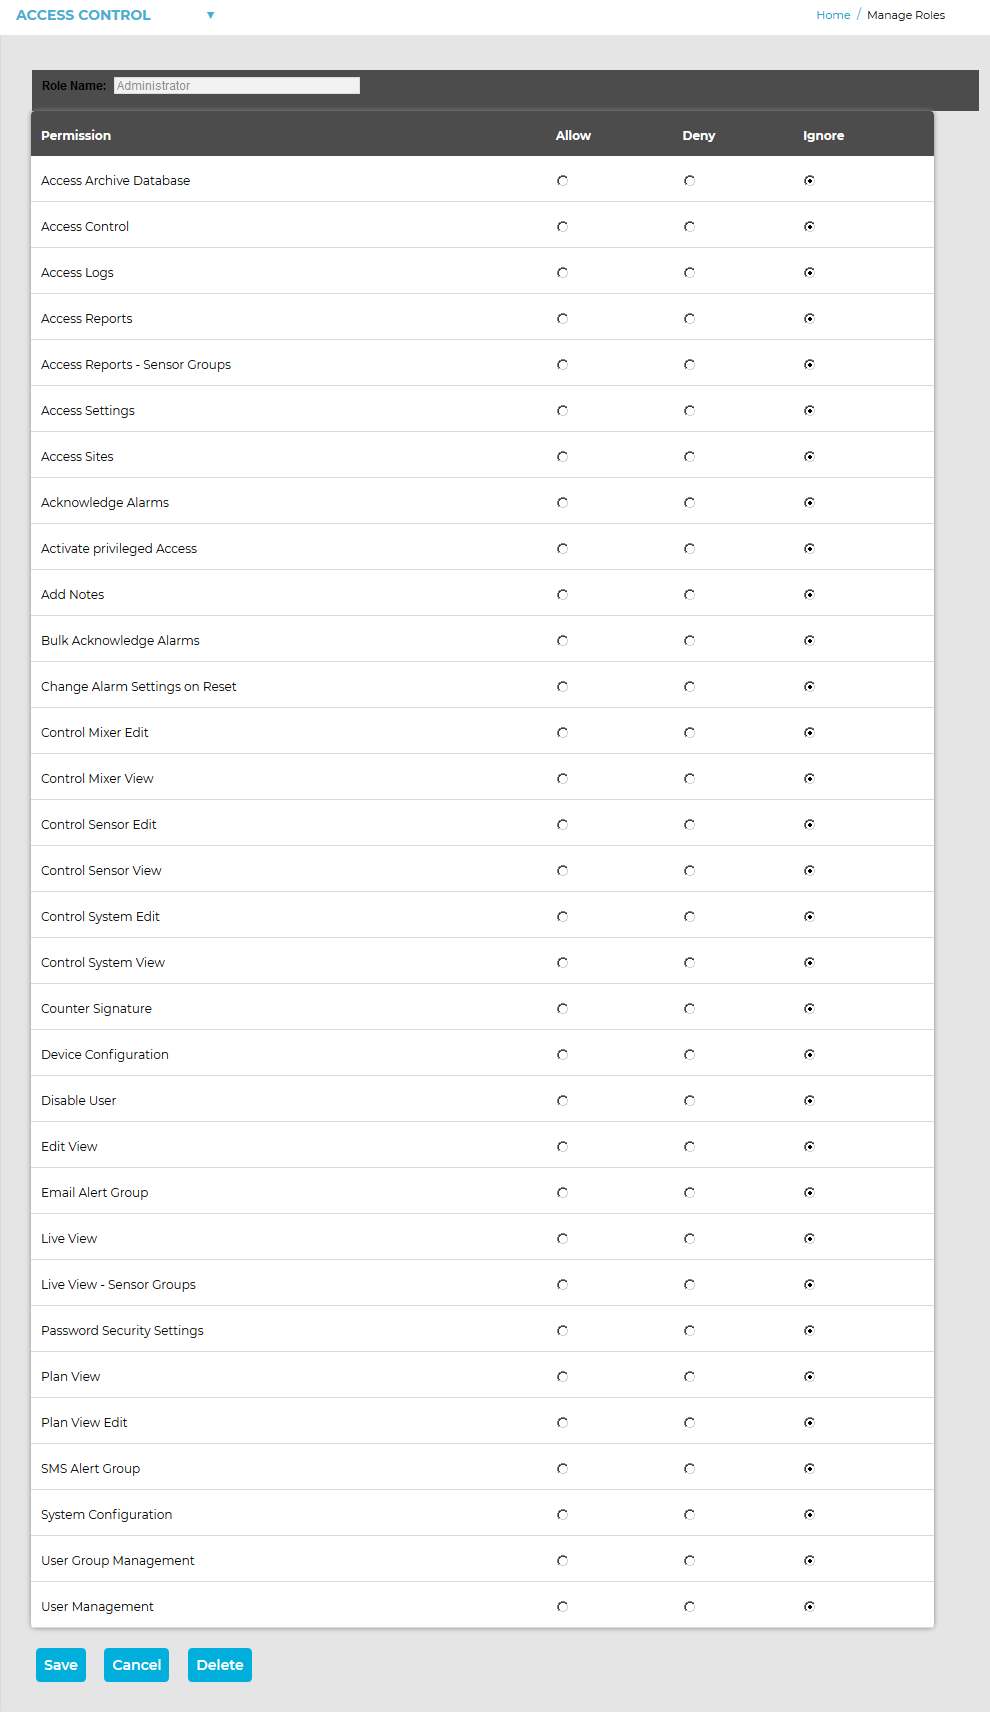
To allocate or remove Permissions to or from an existing Role or delete the Role entirely: 1.Either: Type the name of the Role to be managed into the Search a Role Name: box at the top of the first Manage Roles window. Or: Click [Select] in the Action column of the first Manage Roles window, next to the Role to be managed. •The Manage Role window for the Role is displayed. See Figure 386 below (illustrates an Administrator Role):
Figure 386
2.Allocate or remove Permissions to or from the Role by checking or unchecking the Allow, Deny or Ignore radio buttons. 3.Press the Save button to save the new Permissions allocation for the Role. |
To allocate or remove Permissions to or from an existing Role or delete the Role entirely:
1.Either:
Type the name of the Role to be managed into the Search Role Name: box at the top of the first Manage Roles window.
Or:
Click [Select] in the Action column of the first Manage Roles window, next to the Role to be managed.
•The Manage Roles window for the selected Role is displayed. See Figure 387 below (illustrates an Administrator Role):
Figure 387
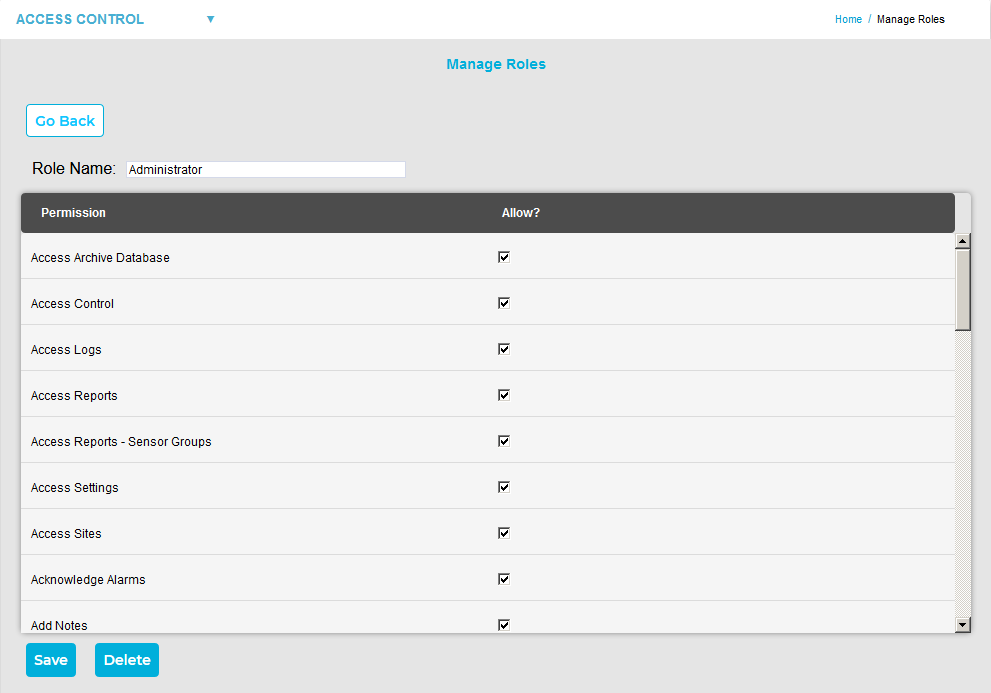
2.Allocate or remove Permissions to or from the Role by ticking or unticking the Allow boxes next to each Permission's entry.
3.Press the Save button to save the new Permissions allocation for the Role.
•You are returned to the first Manage Roles window and a green dialog box is displayed. See Figure 388 below:
Figure 388

1.Click [Select] in the Action column of the first Manage Roles window, next to the Role to be deleted.
| Note: | If using an earlier version of EMS, the Manage Roles window may have a slightly different appearance to the window displayed below; however, it's functionality will be identical. |
•The Manage Roles window for the seletcted Role is displayed. See Figure 389 below (illustrates the 'Guest User' Role):
Figure 389

| Note: | If using an earlier version of EMS, this Manage Roles window may have a different appearance to the window displayed above; however, it's 'Delete' functionality will be identical. |
2.Press the Delete button.
3.The following warning dialog box is displayed. See Figure 390 below:
Figure 390
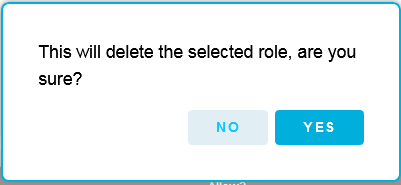
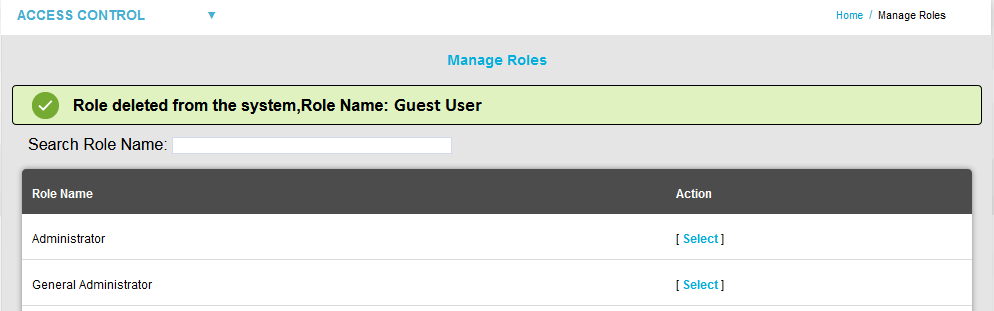
4.Click on Yes.
•The selected Role is deleted and you are returned to the first Manage Roles window. A green dialog box is also displayed. See Figure 391 below:
Figure 391
| Note: | When EMS is installed, a default Admin User is created. This default Admin User cannot be deleted and is preset with the Username: Admin User and the Password: Admin. We recommend that these details are changed immediately after installation. |
➢The default details can be changed in the Add Password section of Admin>User Management.
➢The default Admin User is pre-assigned with all available Permissions.
To assign a Role or Roles to a User:
1.From the System menu, select Access control from the SYSTEM ADMIN list. See Figure 392 below:
Figure 392
•The Access Control window, with buttons for Manage Roles and Manage Users, is displayed. See Figure 393 below:
Figure 393
2.Click on the Manage Users button. See Figure 393 above:
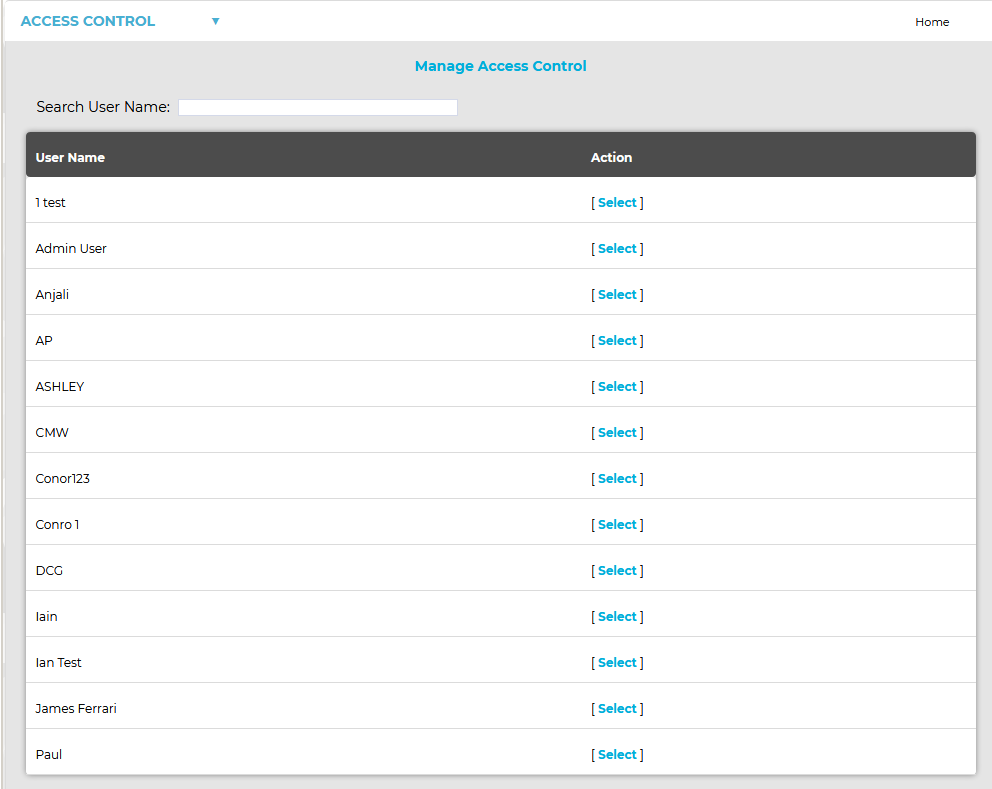
•The Manage Access Control window is displayed. See Figure 394 below:
Figure 394
3.Either:
i.Type the name of the User to be managed into the Search User Name: box at the top of the Manage Users window.
•A new Manage Users window is displayed, showing the name of the typed User in the User Name column. See 395 below:
Figure 395

ii.Click on [Select] next to the required User name.
Or:
Click [Select] in the Action column of the Select a User to Manage window, next to the User that you want to assign a Role or Roles to. See Figure 395 above.
•Using either method displays the Manage Access Control window for the selected User. See Figure 396 below:
Figure 396
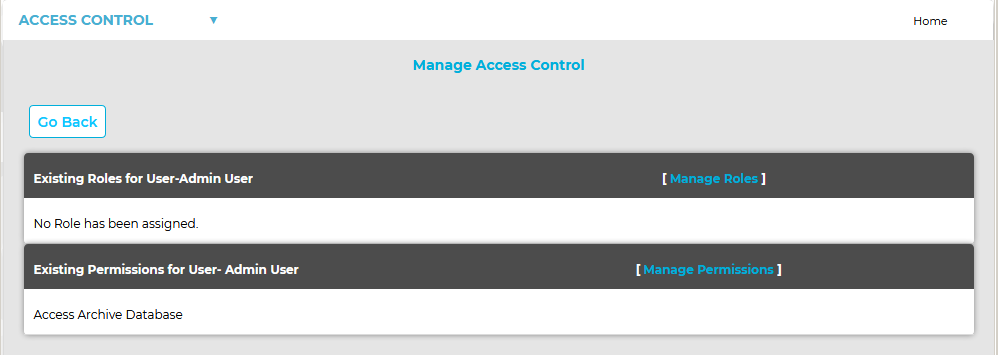
4.Select [Manage Roles] to display another Manage Access Control window for the selected User. See Figure 396 above:
•This window enables a Role or Roles to be selected for the User. See Figure 397 below:
Figure 397
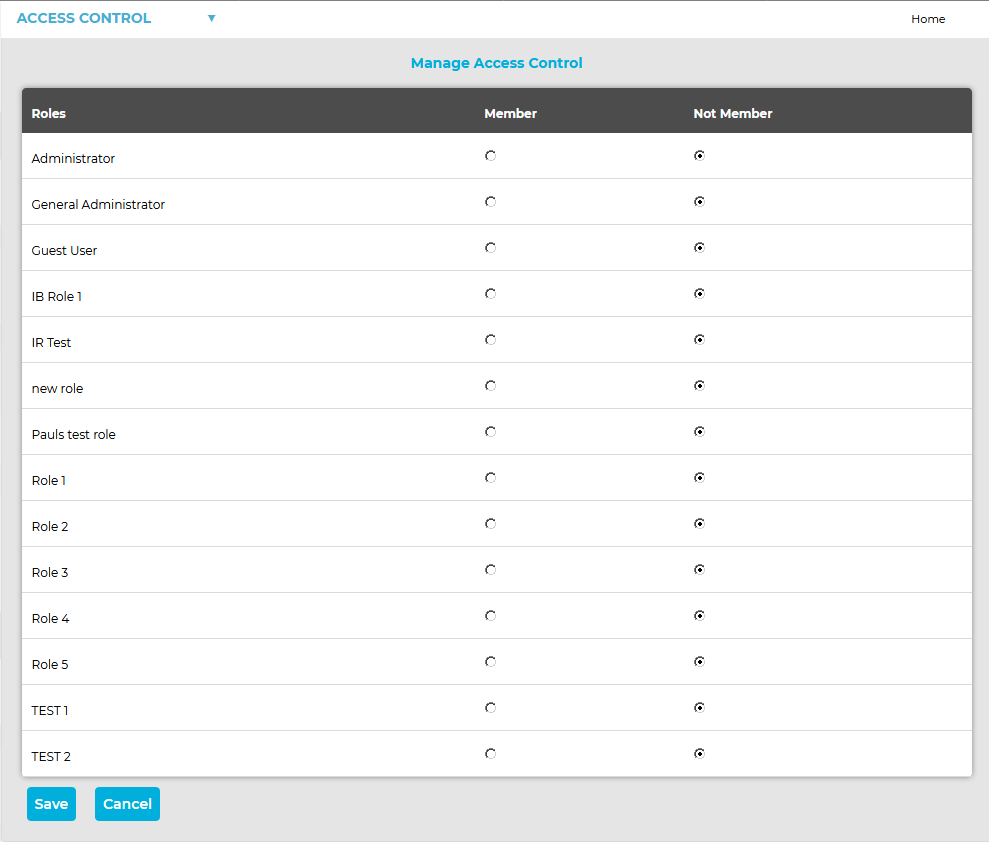
5.In the Manage Access Control window, click on the Member radio button next to each Role that you wish to allocate to the selected User.
•In this case, the previously selected User was Admin User, so we would need to select the Member option button next to Administrator in the Roles column to allocate the Administrator Role to the Admin User.
6.Click on the Save button to complete the allocation of a Role or Roles to the selected User.
•The selected Role is allocated to the selected User and you are returned to the first Manage Access Control window. A green dialog box is also displayed. See Figure 398 below:
Figure 398
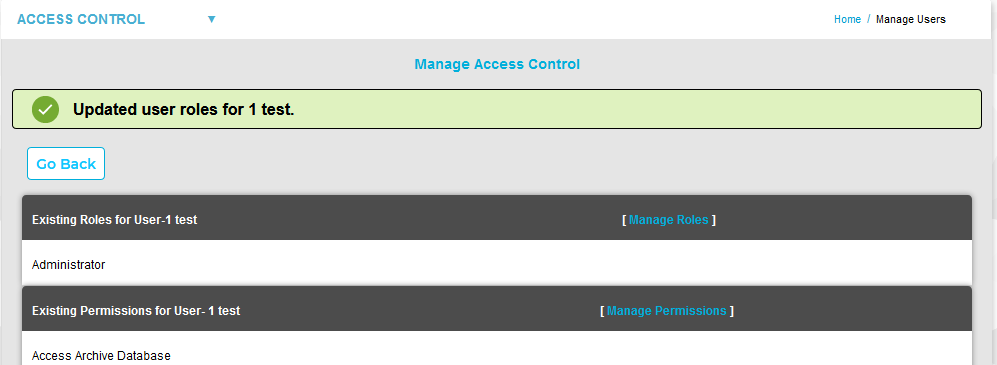
•This User will now inherit the Permissions assigned to this Role.
•More than one User can be assigned to the same Role.
•A User can be assigned to more than one Role.
➢For example a lower level User can be assigned a higher set of Permissions by an Admin User on a temporary basis. This allows a User to stand in for a colleague without the need to access the User settings and individually change the Permissions.